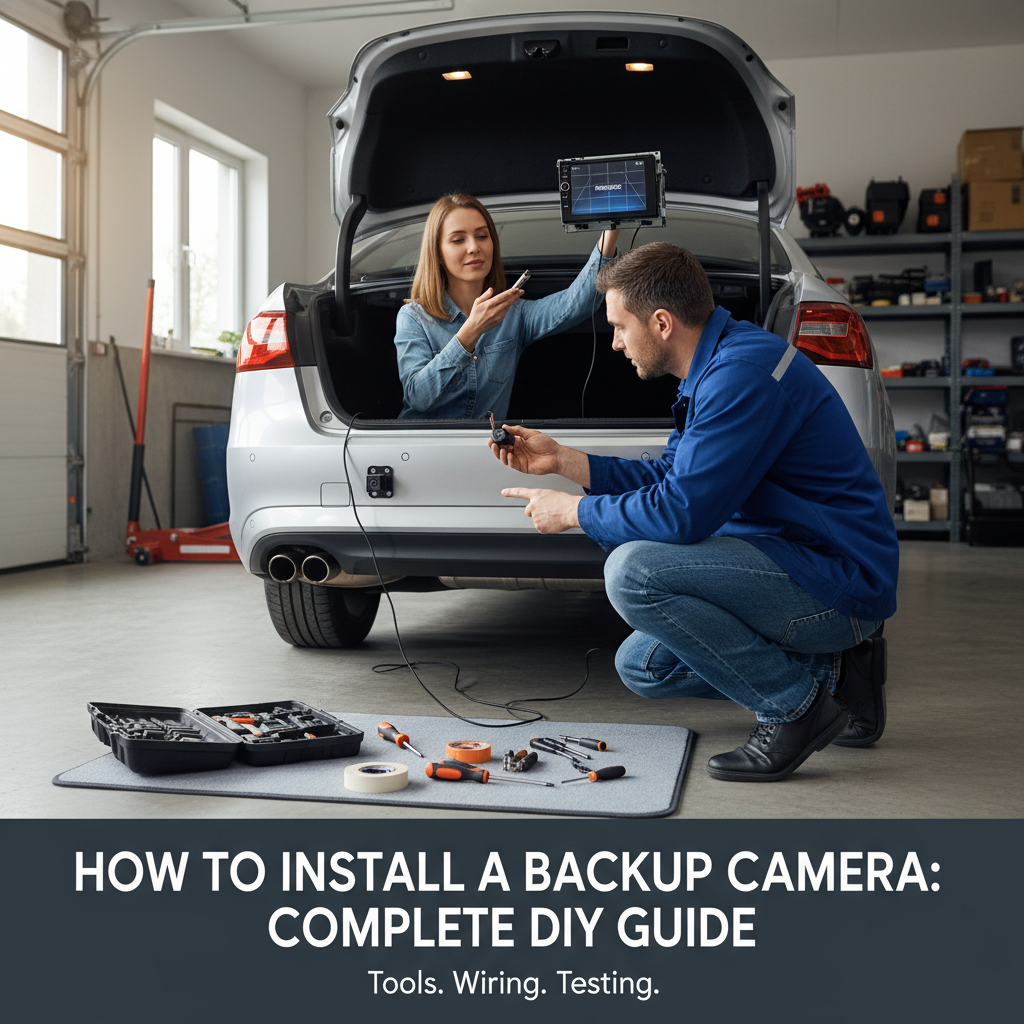
Installing a backup camera on your car enhances safety and makes parking significantly easier. Whether you drive an older vehicle without modern safety features or want to upgrade your current system, adding a backup camera is a practical modification that can prevent accidents and property damage.
This guide covers everything you need to know about selecting, purchasing, and installing a backup camera system in your vehicle. You’ll learn about different camera types, required tools, step-by-step installation procedures, and troubleshooting tips to ensure your project succeeds.
Quick Answer: Installation Overview
Installing a backup camera requires mounting the camera near your license plate, running video cables through your vehicle’s interior, connecting power to your reverse lights, and linking the display to your dashboard or rearview mirror. Most installations take 3-5 hours and require basic automotive tools.
The process involves four main components: the camera unit, display screen, wiring harness, and power connections. Wireless systems simplify installation by eliminating the need to run video cables through your entire vehicle.
Contents
- Types of Backup Camera Systems
- Essential Tools and Materials to Install a Backup Camera on Your Car
- Pre-Installation Planning to Install a Backup Camera on Your Car
- Step-by-Step Installation Process to Install a Backup Camera on Your Car
- Common Installation Challenges
- System Testing and Calibration
- Maintenance and Troubleshooting
- Frequently Asked Questions
- Final Thoughts
Types of Backup Camera Systems
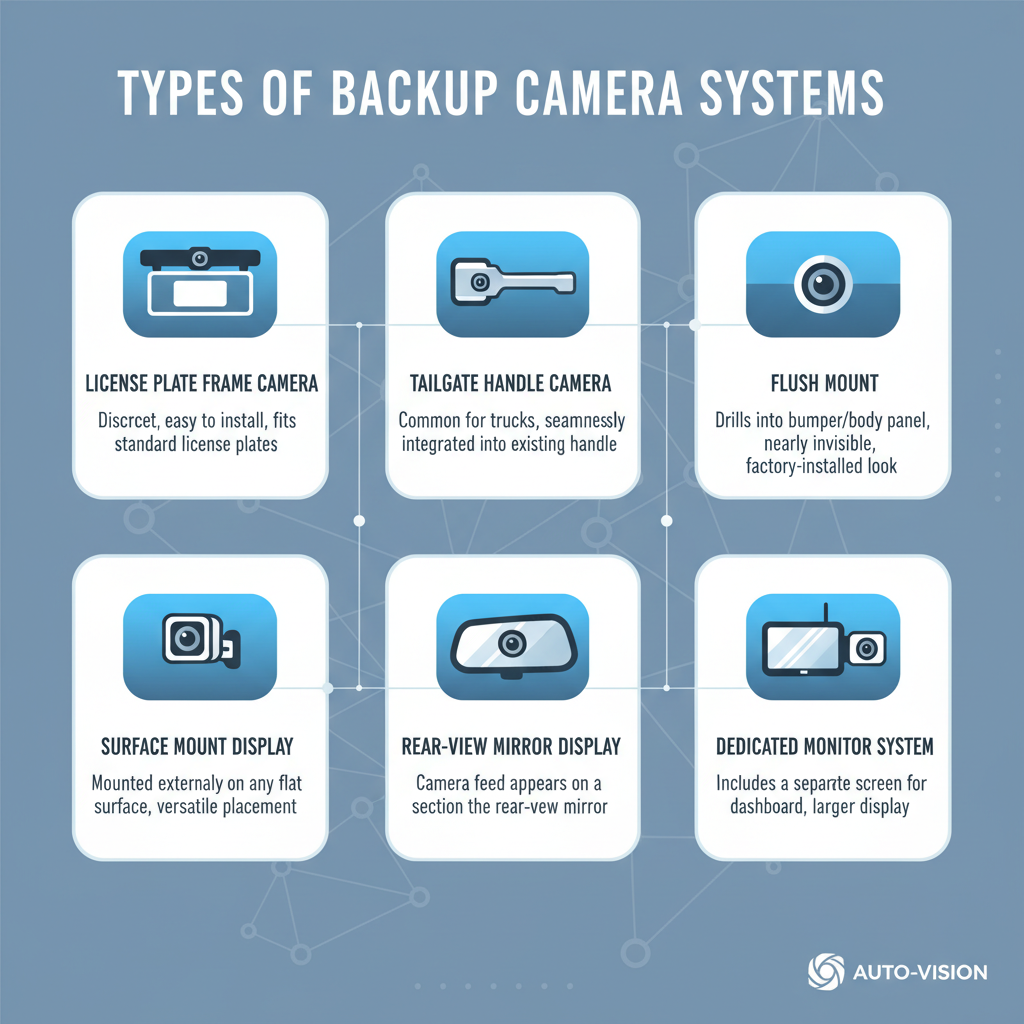
Understanding your options helps you choose the right system for your vehicle and skill level.
Wired Systems offer the most reliable connection between camera and display. These systems require running cables from the rear camera to the front display, which means removing interior panels and potentially drilling holes. Wired systems typically provide better video quality and don’t suffer from wireless interference.
Wireless Systems transmit video signals without cables, making installation much simpler. The camera unit includes a transmitter, while the display has a built-in receiver. However, wireless systems can experience interference from other electronic devices and may have slightly delayed video transmission.
License Plate Frame Cameras mount directly to your existing license plate frame, making them easy to install and nearly invisible. These cameras work well for most vehicles but may have limited viewing angles compared to dedicated mounting solutions.
Replacement Mirror Systems integrate the display into a new rearview mirror that replaces your existing one. This approach provides a clean installation without adding dashboard clutter, though some drivers find the mirror display distracting initially.
Essential Tools and Materials to Install a Backup Camera on Your Car
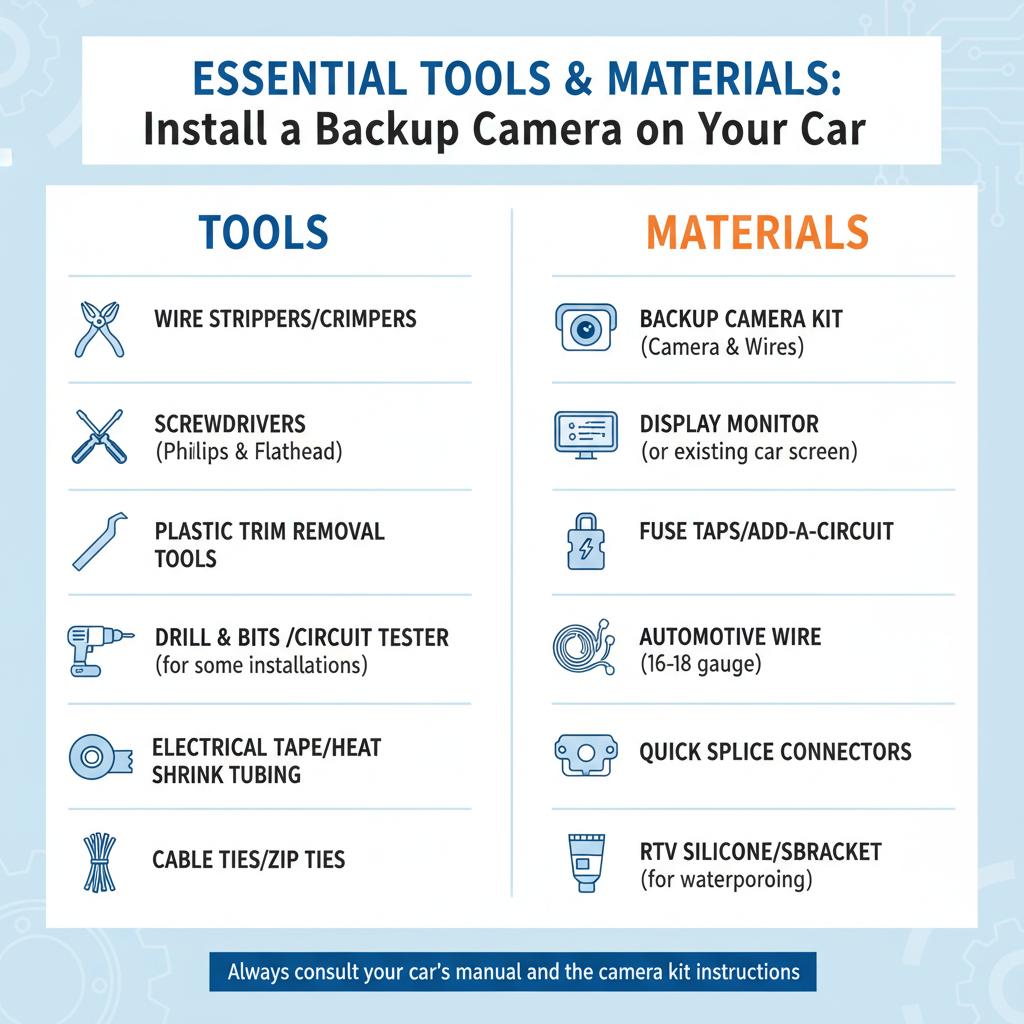
Proper preparation ensures smooth installation and prevents damage to your vehicle.
Basic Tools Required:
– Socket wrench set
– Screwdriver set (Phillips and flathead)
– Wire strippers and crimpers
– Electrical tape
– Zip ties
– Drill with various bit sizes
– Multimeter for testing connections
Additional Materials:
– Backup camera kit (camera, display, wiring harness)
– Electrical connectors and butt splices
– Fuse taps for power connections
– Cable routing tools or coat hangers
– Silicone sealant for weatherproofing
– Panel removal tools (plastic pry bars)
Field experience shows that having extra electrical connectors on hand prevents delays when original connections don’t fit properly or get damaged during installation.
Pre-Installation Planning to Install a Backup Camera on Your Car
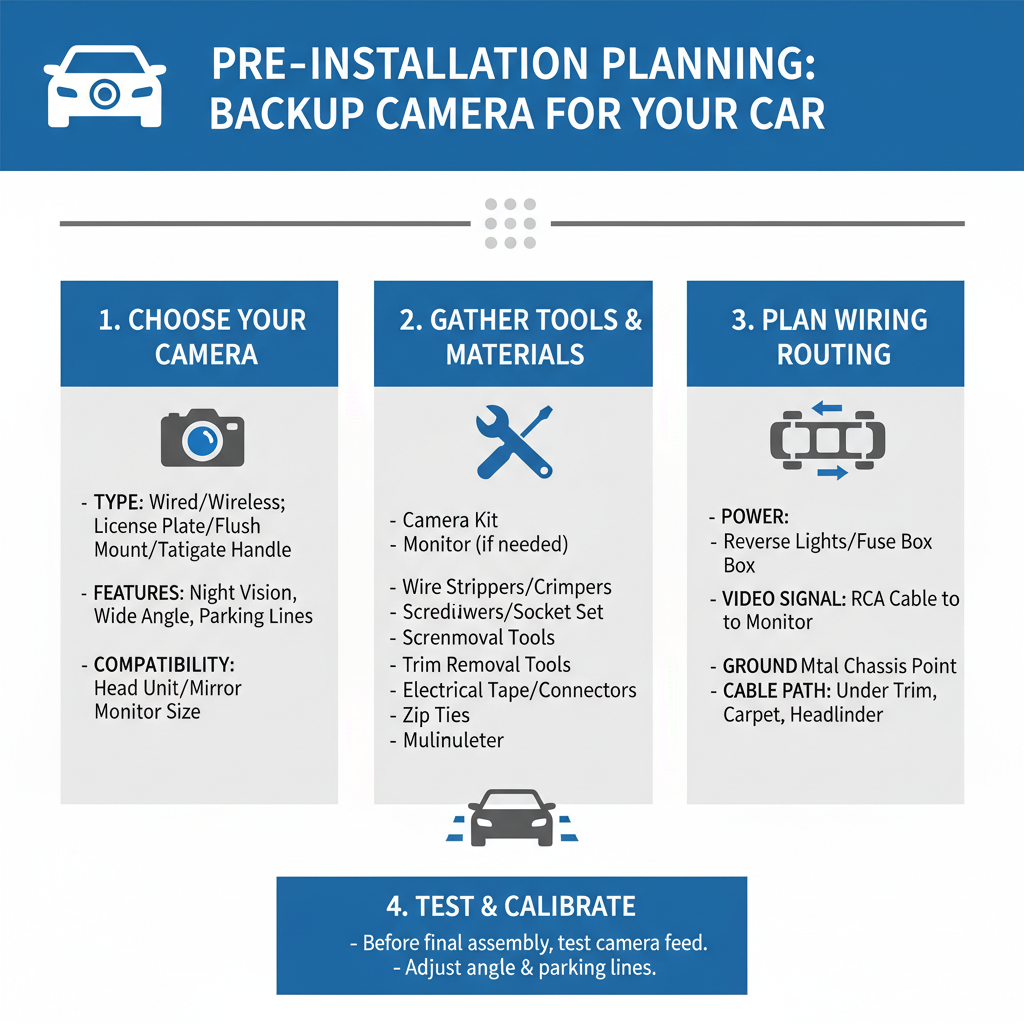
Successful installation starts with understanding your vehicle’s layout and choosing optimal component placement.
Camera Placement Considerations focus on maximizing rear visibility while protecting the camera from damage. The ideal location provides a wide viewing angle without obstruction from bumper components, trailer hitches, or spare tire mounts. Most installations place the camera slightly above the license plate or integrated into the rear handle area.
Display Location Options depend on your preferences and dashboard configuration. Dashboard-mounted displays offer easy viewing but require finding appropriate mounting locations. Rearview mirror replacements provide integrated functionality but may require additional wiring for power and ground connections.
Power Source Planning involves identifying your reverse light circuit for camera activation. The camera should only operate when the transmission is in reverse, which requires tapping into the reverse light power supply. This connection ensures the camera activates automatically without manual switching.
Step-by-Step Installation Process to Install a Backup Camera on Your Car
Begin installation with the vehicle parked on level ground and the battery disconnected for safety.
Camera Mounting starts with selecting the exact installation location. Clean the mounting area thoroughly and mark screw holes if using a bracket-mounted camera. License plate frame cameras simply replace your existing frame, while custom mounts may require drilling pilot holes. Apply silicone sealant around mounting points to prevent water intrusion.
Running Video Cables requires the most time and patience. Start from the camera location and work toward the front of the vehicle. Remove interior panels carefully to access routing paths behind trim pieces. Common routes include following existing wiring harnesses along the vehicle’s frame or running cables through the headliner and down the A-pillar to the dashboard.
Power Connection Setup involves locating your reverse light wires, typically found in the rear light assembly or near the transmission. Use a multimeter to identify which wire carries power when the transmission is in reverse. Connect the camera’s power wire using a proper splice connector, ensuring the connection is secure and weatherproof.
Display Installation and Wiring completes the system setup. Dashboard displays typically mount using adhesive pads or bracket systems. Connect the video input cable and power supply according to manufacturer specifications. Rearview mirror displays replace the existing mirror and connect to your vehicle’s electrical system for power.
Common Installation Challenges
Understanding typical problems helps you avoid mistakes and troubleshoot issues effectively.
Cable Routing Difficulties often arise when trying to run wires through tight spaces or around obstacles. In practice, removing seats and interior panels provides better access to routing paths. Using fish tape or straightened coat hangers helps guide cables through confined areas behind panels.
Power Connection Issues frequently involve incorrect wire identification or poor connections. Always verify reverse light operation before making final connections. Some vehicles have multiple reverse light circuits, so testing with a multimeter ensures you’re connecting to the correct power source.
Display Integration Problems can occur when aftermarket displays don’t fit properly in chosen locations or interfere with existing controls. Measure available space carefully before purchasing equipment, and consider professional installation if dashboard modifications are required.
Weather Sealing Concerns become apparent after installation when moisture enters camera housings or connection points. Apply dielectric grease to electrical connections and ensure all mounting points have proper sealing to prevent water damage.
System Testing and Calibration
Proper testing ensures your backup camera system functions correctly and safely.
Initial Function Testing begins with reconnecting the battery and starting the vehicle. Shift into reverse and verify the camera activates and displays a clear image. Check that the display turns off when shifting out of reverse, confirming proper power connection to the reverse light circuit.
Image Quality Assessment involves evaluating video clarity, color accuracy, and viewing angle coverage. Adjust camera angle if necessary to optimize the rear view while minimizing ground coverage that doesn’t provide useful information. Most cameras allow minor angle adjustments after mounting.
Night Vision Performance requires testing in low-light conditions to ensure adequate visibility. Quality backup cameras include infrared LEDs for night vision, but performance varies significantly between models. Test the system in various lighting conditions to understand its limitations.
System Response Time should be minimal when shifting into reverse. Wireless systems may have slight delays compared to wired installations, but excessive lag indicates potential interference or connection problems requiring troubleshooting.
Maintenance and Troubleshooting
Regular maintenance keeps your backup camera system functioning reliably over time.
Routine Cleaning involves wiping the camera lens regularly to maintain clear visibility. Road salt, mud, and debris can accumulate on the camera housing, reducing image quality. Use appropriate cleaning solutions that won’t damage the camera lens or housing materials.
Connection Inspection should be performed periodically, especially after harsh weather or off-road driving. Check power connections for corrosion and ensure video cables remain secure. Loose connections cause intermittent operation or complete system failure.
Common Problems include foggy displays, intermittent operation, or complete system failure. Foggy displays often indicate moisture intrusion requiring better sealing. Intermittent operation typically points to loose connections or failing components. Complete failure usually involves power supply problems or damaged cables.
A common issue technicians encounter is camera failure after car washes or heavy rain, indicating inadequate weatherproofing during installation. Proper sealing prevents most moisture-related problems.
Frequently Asked Questions
Can I install a backup camera on any vehicle? Most vehicles can accommodate backup camera installation, though older cars may require more extensive modification. The main requirements are access to reverse light power and suitable mounting locations for the camera and display.
How much does professional installation cost compared to DIY?
Professional installation typically costs $200-500 depending on system complexity and vehicle type. DIY installation saves labor costs but requires time and basic automotive skills. Factor in tool costs if you don’t own necessary equipment.
Will adding a backup camera affect my vehicle’s warranty?
Aftermarket installations generally don’t void vehicle warranties unless the modification directly causes a covered component failure. However, dealerships may refuse warranty work on modified electrical systems, so consider this before installation.
What’s the difference between
Wired systems provide more reliable connections and better video quality but require running cables through the vehicle. Wireless systems offer easier installation but may experience interference and have slight transmission delays.
How do I choose the right backup camera for my vehicle? Consider your vehicle size, typical driving conditions, and installation complexity preferences. Larger vehicles benefit from wide-angle cameras, while compact cars work well with standard viewing angles. Night driving requires cameras with good low-light performance.
Can backup cameras work with existing infotainment systems? Some newer vehicles allow integration with factory displays through specific adapter cables or modules. However, most aftermarket installations require separate display units unless you have professional integration performed.
What should I do if my backup camera stops working? Start by checking power connections and fuses, then inspect video cable connections. Clean the camera lens and verify the display unit functions properly. If problems persist, the camera unit itself may require replacement.
Final Thoughts
Installing a backup camera enhances vehicle safety and provides valuable assistance during parking and reversing maneuvers. While the installation process requires patience and basic automotive skills, most car owners can successfully complete the project with proper planning and attention to detail.
Choose a system that matches your technical comfort level and vehicle requirements. Wired systems offer superior reliability for those willing to invest extra installation time, while wireless options provide acceptable performance with simplified setup procedures.
Take time to properly seal all connections and test system functionality thoroughly before completing the installation. Regular maintenance and periodic inspection ensure your backup camera system continues providing reliable service for years to come.