Car audio has evolved dramatically over the years. Gone are the days when you had to settle for basic AM/FM radio and a cassette player. Modern car stereo systems now offer touchscreen displays, navigation, smartphone integration, and much more. If your vehicle came with a single DIN stereo system, you might feel left behind in this audio revolution. But don’t worry – a single DIN to double DIN conversion can transform your driving experience.
A single DIN to double DIN conversion involves replacing your car’s compact 2-inch tall stereo with a larger 4-inch tall unit that offers touchscreen displays, smartphone integration, and advanced features. Most vehicles can accommodate this upgrade if there’s sufficient space in the dashboard, which often exists as storage compartments or trim pieces around the original radio. The conversion requires a vehicle-specific dash kit, wiring harness adapter, and the new double DIN head unit, with installation typically taking 1-3 hours depending on your car’s complexity.
Contents
- Understanding DIN Sizes: The Basics
- Why Upgrade to Double DIN?
- Assessing Your Vehicle’s Compatibility
- Essential Equipment for Your Conversion
- Step-by-Step Conversion Process
- Common Challenges and Solutions
- Professional vs. DIY Installation
- Enhancing Your System Beyond the Head Unit
- Maintaining Value and Reversibility
- Final Thoughts
Understanding DIN Sizes: The Basics
Before diving into the conversion process, let’s clarify what “DIN” actually means. DIN stands for “Deutsches Institut für Normung,” the German institute that established these standardized measurements for car stereos.
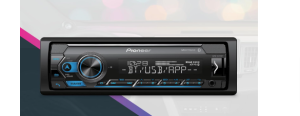
A single DIN head unit measures approximately 2 inches (50mm) in height and 7 inches (180mm) in width. This compact size was the standard for many years, especially in older vehicles.
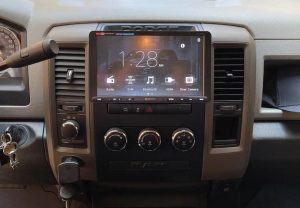
A double DIN unit maintains the same width but doubles the height to about 4 inches (100mm). This larger face area allows for bigger displays, more controls, and advanced features that simply wouldn’t fit on a single DIN unit.
Why Upgrade to Double DIN?
You might wonder if a conversion is worth the effort. Here are some compelling reasons to make the switch:
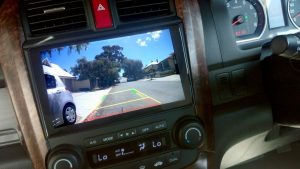
Larger Display: Double DIN units offer significantly more screen real estate. This means better visibility for navigation maps, backup cameras, and media controls.
Enhanced Features: Modern double DIN units come packed with features like Apple CarPlay, Android Auto, HD Radio, satellite radio compatibility, and built-in navigation systems.
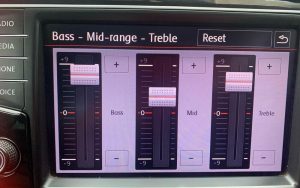
Better Sound Processing: Many double DIN units include more advanced audio processors, equalizers, and crossover settings that can dramatically improve your sound quality.
Increased Resale Value: A well-installed double DIN system can actually boost your vehicle’s resale value, especially if you choose a high-quality unit that integrates well with your car’s interior.
Future-Proofing: As technology continues to advance, double DIN systems are better positioned to receive updates and remain compatible with new smartphones and media formats.
Assessing Your Vehicle’s Compatibility
Not every vehicle can easily accommodate a double DIN conversion. Before purchasing any equipment, you need to assess your car’s dashboard and determine if a conversion is feasible.
Checking Physical Space
Look at your current stereo setup. In many cases, you’ll notice that while your factory radio is a single DIN size, it may be housed in a larger space with plastic trim or storage compartments filling the extra room. This scenario offers the easiest path to conversion.
Some vehicles have dash designs that make conversion challenging. Cars with climate controls integrated into the stereo unit or uniquely shaped dashboards might require more extensive modifications.
Identifying Your Vehicle’s Dash Kit Needs
Each vehicle model has specific requirements for installation. You’ll need a dash kit (also called an installation kit or mounting kit) designed specifically for your make and model. These kits typically include:
- A faceplate that fits your vehicle’s dash opening
- Mounting brackets to secure the new head unit
- Hardware for assembly
- Wiring harness adapters in some cases
Popular manufacturers like Metra, Scosche, and American International produce vehicle-specific kits for most common makes and models.
Essential Equipment for Your Conversion
A successful conversion requires the right tools and components. Here’s what you’ll need:
The Double DIN Head Unit
When selecting your new stereo, consider these factors:
Features: Decide which features matter most to you. Do you need built-in navigation? Is smartphone integration essential? How important is sound quality?
Brand Reputation: Established brands like Pioneer, Kenwood, Alpine, JVC, and Sony have proven track records for reliability and support.
Budget: Double DIN units range from under $100 for basic models to over $1,000 for premium units with all the bells and whistles.
Power Output: If you plan to upgrade your speakers or add amplifiers later, ensure your head unit has adequate preamp outputs and power ratings.
Vehicle-Specific Installation Kit
As mentioned earlier, you’ll need a dash kit designed for your specific vehicle. These typically cost between $10-50 depending on your vehicle and the kit’s complexity.
Wiring Harness Adapter
A wiring harness adapter connects your new stereo to your vehicle’s factory wiring without cutting any original wires. This preserves your vehicle’s electrical integrity and makes it easier to revert to stock if needed.
Tools for Installation
Basic tools you’ll need include:
- Screwdrivers (Phillips and flat-head)
- Panel removal tools (plastic pry tools)
- Wire cutters/strippers
- Electrical tape or heat shrink tubing
- Crimping tool for connectors
- Socket set (for some vehicles)
Step-by-Step Conversion Process
While specific steps vary by vehicle, here’s a general guide to performing a single DIN to double DIN conversion:
Safety First
Start by disconnecting your vehicle’s battery to prevent electrical shorts or damage to components during installation. Wait a few minutes after disconnecting to allow any residual power in the system to dissipate.
Removing the Factory Stereo
- Use panel removal tools to carefully pry away any trim pieces surrounding your radio.
- Remove any screws or bolts securing the radio to the dash.
- Pull the radio out gently, being careful not to damage any wiring.
- Disconnect the wiring harnesses and antenna from the back of the unit.
Preparing the Dash Opening
In many cases, you’ll need to modify the dash opening to accommodate the larger double DIN unit:
- Remove any brackets or supports designed for the single DIN unit.
- If your dash has a storage pocket or other component taking up the extra space, remove it completely.
- Some vehicles may require cutting or modifying plastic sections within the dash cavity. Follow your dash kit instructions carefully if this is needed.
Wiring the New Head Unit
- Connect the wiring harness adapter to your new stereo’s wiring harness. Match wire colors and secure connections with crimp connectors, solder, or high-quality electrical tape.
- Connect any additional wires like parking brake safety leads, backup camera inputs, or external amplifier wires if applicable.
- Attach the antenna adapter if needed.
Installing the Mounting Kit
- Assemble the dash kit according to the manufacturer’s instructions.
- Secure the mounting brackets to your new double DIN stereo.
- Test-fit the assembly in your dash to ensure proper alignment before final installation.
Final Installation
- Connect all wiring to the back of your new stereo.
- Carefully slide the unit into the dash opening, ensuring no wires are pinched.
- Secure the unit using the provided screws or mounting hardware.
- Reattach any trim pieces removed earlier.
- Reconnect your vehicle’s battery.
Common Challenges and Solutions
Even with careful planning, you might encounter some challenges during your conversion:
Depth Constraints
Double DIN units are often deeper than single DIN units. In some vehicles, this can cause interference with climate control ducts, structural components, or other dash elements.
Solution: Measure the available depth before purchasing your new stereo. Some brands offer “shallow mount” double DIN units specifically designed for tight installations. You might also need to relocate interfering components if possible.
Wiring Complexities
Modern vehicles often have complex wiring systems, including data networks that integrate the stereo with other vehicle systems.
Solution: Vehicle-specific wiring harnesses are essential. For cars with CANBUS or other advanced systems, you might need a specialized interface module that maintains compatibility with features like steering wheel controls or factory amplifiers.
Dash Modifications
Some vehicles require cutting or modifying the dashboard structure to accommodate a double DIN unit.
Solution: If you’re uncomfortable making permanent modifications to your dash, consider hiring a professional installer. They have the experience and tools to make clean, precise cuts that won’t damage your dashboard’s appearance.
Professional vs. DIY Installation
Should you tackle this project yourself or hire a professional? Consider these factors:
DIY Advantages:
- Cost savings on labor (typically $100-300)
- Personal satisfaction of completing the project
- Learning experience about your vehicle’s systems
Professional Installation Advantages:
- Expertise with complex wiring systems
- Proper tools for clean dash modifications
- Knowledge of vehicle-specific quirks
- Installation warranty (typically 1-3 years)
- Time savings (usually completed in 1-3 hours)
If your vehicle requires significant dash modifications or has complex factory integration systems, professional installation might be worth the investment.
Enhancing Your System Beyond the Head Unit
While your new double DIN unit will significantly improve your car’s audio system, you might want to consider these complementary upgrades:
Improved Speakers
Factory speakers are rarely designed for optimal sound quality. Upgrading to aftermarket speakers can dramatically improve clarity and frequency response. Consider component speakers for front positions to enhance staging and imaging.
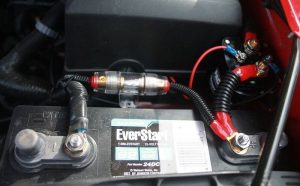
Amplification
A dedicated amplifier provides cleaner power than your head unit’s built-in amplifier. This results in better dynamics, higher volume capability without distortion, and improved overall sound quality.
Subwoofer Integration
Many factory systems lack low-frequency output. Adding a subwoofer completes your system’s frequency range and takes pressure off smaller speakers by handling bass frequencies.
Sound Deadening
Reducing road noise through sound deadening materials improves your listening experience dramatically. Even modest application of sound deadening in doors and key areas can make a significant difference.
Maintaining Value and Reversibility
If you’re concerned about maintaining your vehicle’s value or might want to return it to stock condition later:
- Keep all original components carefully stored
- Use vehicle-specific wiring adapters rather than cutting factory wires
- Avoid irreversible dash modifications when possible
- Document the original setup with photos before disassembly
- Consider a professional installation that preserves factory appearance
Final Thoughts
A single DIN to double DIN conversion represents one of the most impactful upgrades you can make to your vehicle’s infotainment system. With careful planning and the right components, you can transform your driving experience with enhanced connectivity, better sound quality, and modern features like touchscreen interfaces and smartphone integration.
Whether you tackle the project yourself or hire a professional, the results are well worth the investment. Your daily commute or road trip will never be the same once you’ve experienced the benefits of a properly installed double DIN system.
Remember that taking your time with research and installation pays dividends in both performance and appearance. A rush job often leads to rattles, poor fit, or electrical issues down the road. Patience during the conversion process ensures years of enjoyment from your upgraded system.