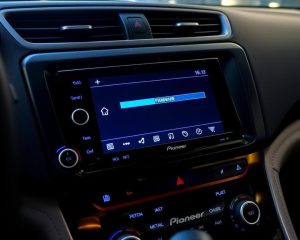
So you’ve decided to upgrade your car’s stereo system but want to keep your factory amplifier? Great choice! Using your factory amp with an aftermarket stereo can save you money while still improving your sound quality. This guide will walk you through everything you need to know about connecting your new head unit to your existing factory amplifier.
Contents
Understanding Your Factory Amplifier System
Before diving into the installation process, it’s important to understand what you’re working with. Factory amplifiers are designed specifically for your vehicle’s audio system and often include features like:
- Model-specific equalization settings
- Speaker-specific power ratings
- Integration with other vehicle systems
- Vehicle-specific connectors and wiring
Factory amplifiers typically receive both audio signals and power control signals from the factory head unit. When you replace the head unit with an aftermarket stereo, you’ll need to ensure both these connections are maintained properly.
Why Keep Your Factory Amplifier?
You might wonder if keeping your factory amp is worth the effort. Here are some compelling reasons:
- Cost savings – Replacing both the head unit and amplifier can get expensive quickly
- Simpler installation – Using existing components means less rewiring
- Factory integration – Many factory amps are well-integrated with the vehicle’s speaker system
- Space efficiency – No need to find room for a new amplifier
- Sound quality – Many factory amps, particularly in premium sound systems, actually deliver good performance
Tools and Materials You’ll Need
Before starting, gather these tools and materials:
- Wire cutters/strippers
- Crimping tool
- Electrical tape or heat shrink tubing
- Digital multimeter
- Vehicle-specific wiring harness adapter
- RCA cables (if needed)
- LOC (Line Output Converter) – may be required
- Wiring diagrams for your vehicle (available online or in service manuals)
Step-by-Step Installation Process
1. Research Your Vehicle’s Audio System
First, research your specific vehicle’s audio system. Look up:
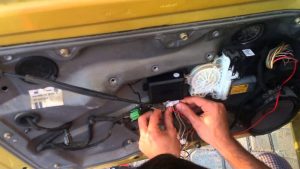
- Amplifier location (often under seats, in trunks, or behind dash panels)
- Factory wiring diagrams
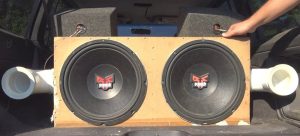
- Speaker configurations
- Any known issues with aftermarket upgrades
Many online forums and YouTube videos offer vehicle-specific guidance. For example, Ford F-150 owners might find different challenges than Toyota Camry owners.
2. Purchase the Right Harness Adapter
The correct wiring harness adapter is crucial. This adapter connects your aftermarket head unit to your vehicle’s factory wiring system. Companies like Metra, PAC Audio, and Crutchfield offer vehicle-specific harnesses.
Look for a harness adapter that:
- Maintains factory amplifier turn-on signal
- Preserves all audio channels
- Connects properly to your specific vehicle model
- Includes any necessary interface modules
The right harness can make installation much simpler and prevents damage to your vehicle’s electrical system.
3. Determine Signal Type Needs
Factory amplifiers typically accept one of two types of input signals:
High-level (speaker-level) inputs: These are amplified signals, the same ones that would normally go directly to speakers.
Low-level (RCA) inputs: These are unamplified signals that most aftermarket head units provide through RCA connections.
Most factory amplifiers use high-level inputs, while aftermarket head units typically output low-level signals via RCA connectors. This mismatch means you might need a Line Output Converter (LOC) to make the two work together.
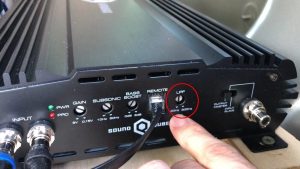
4. Install a Line Output Converter (If Needed)
If your aftermarket head unit doesn’t have high-level outputs compatible with your factory amp, a Line Output Converter (LOC) is necessary. The LOC converts the low-level RCA outputs from your new head unit into high-level signals your factory amp can understand.
To install an LOC:
- Connect the RCA outputs from your head unit to the LOC inputs
- Connect the high-level outputs from the LOC to your factory amp’s input wires
- Secure the LOC in a location protected from heat and moisture
- Ensure all connections are tight and well-insulated
Quality LOCs from brands like AudioControl, PAC, or Kicker will provide cleaner audio conversion and may include additional features like gain adjustment.
5. Connecting the Remote Turn-On Wire
Factory amplifiers need a signal to turn on when the stereo is activated. This is handled by the remote turn-on wire, usually blue or blue with white stripe.
The remote wire connection is critical because:
- It ensures your amp only powers on when needed
- It prevents battery drain when the car is off
- It synchronizes power-up between components to prevent pops or other noises
Connect the remote turn-on wire from your aftermarket head unit to the corresponding wire in your vehicle’s harness that controls the factory amp.
6. Making Power Connections
Your factory amp gets power from the vehicle’s electrical system. When installing an aftermarket head unit:
- Identify the power wires in your factory harness
- Connect matching power wires from the aftermarket harness adapter
- Ensure ground connections are solid and free of paint or corrosion
- Double-check polarity to prevent damage to your equipment
Some vehicles have memory wires that maintain radio presets when the vehicle is off. Be sure to connect these as well.
7. Connecting Audio Signal Wires
The audio signal wires carry the actual music from your head unit to your amplifier. When connecting these:
- Match front, rear, and subwoofer channels correctly
- Maintain proper left and right channel orientation
- Use high-quality cables to minimize noise
- Keep audio cables away from power wires to prevent interference
Color-coded wiring in harness adapters makes this step easier, but always verify connections with your vehicle’s wiring diagram.
8. Testing Before Finalizing Installation
Before securing everything permanently, it’s crucial to test your connections:
- Turn on the vehicle (but not the engine) and power up your new head unit
- Verify that all speakers are working
- Check for any unusual noises, distortion, or incorrect channel routing
- Test at various volume levels to ensure clean sound
- Make sure the amp turns on and off properly with the head unit
If everything checks out, you can finalize your installation by securing all components and tucking away wiring neatly.
Common Challenges and Solutions
Dealing with Signal Sensing Amps
Some factory amplifiers are “signal sensing” and turn on automatically when they detect an audio signal rather than requiring a remote wire. For these systems:
- The amp may take several seconds to power on
- Low volume may not trigger the amp to turn on
- You might hear the first second of audio cut off
If you encounter these issues, consider installing a dedicated remote turn-on circuit or using a device like the PAC LP7-4 L.O.C. PRO that provides a remote output signal.
Handling Factory Equalization
Many factory amplifiers have built-in equalization curves designed for the original stereo and speakers. This can affect sound quality when using an aftermarket head unit.
Solutions include:
- Using a DSP (Digital Signal Processor) to correct the frequency response
- Selecting an aftermarket head unit with advanced EQ settings
- Installing an audio interface like the JL Audio FiX that corrects factory EQ curves
Preventing Turn-On/Turn-Off Pops
A common issue when connecting aftermarket head units to factory amps is hearing a “pop” through the speakers when turning the system on or off. This happens when components power up or down in the wrong sequence.
To prevent this:
- Install a turn-on delay module
- Use a power sequencer that controls the order of component activation
- Ensure all ground connections are solid and noise-free
Addressing Volume Control Issues
Sometimes after connecting an aftermarket stereo to a factory amp, you might find the volume behavior is different – either too sensitive or not responsive enough.
To fix this:
- Adjust the gain settings on your LOC if you’re using one
- Check the output level settings on your head unit
- Use a head unit with more precise volume control steps
- Install a volume control module between the head unit and factory amp
Fine-Tuning Your System
Once your system is working, take time to fine-tune it for optimal performance:
Setting Proper Gains
Setting proper gains ensures you get the best sound quality without distortion:
- Start with the head unit volume at about 75% of maximum
- Adjust LOC gains (if applicable) until audio is clear without distortion
- Fine-tune using test tones or music with a variety of dynamic ranges
- Listen for any clipping or distortion and reduce gains if detected
Optimizing Audio Settings
Your new head unit likely offers more audio adjustments than your factory unit:
- Set the EQ to compensate for vehicle acoustics
- Adjust crossover points to match your factory speaker capabilities
- Set time alignment if your head unit offers this feature
- Create sound presets for different types of music or driving conditions
Adding Sound Deadening
To truly improve your audio experience, consider adding sound deadening material to your vehicle. This reduces road noise and improves bass response by minimizing vibrations.
When to Consider Upgrading Your Factory Amp
While keeping your factory amp is often practical, there are situations where upgrading might make more sense:
- If your factory amp has insufficient power for your needs
- When the factory amp produces poor sound quality even after proper setup
- If you’re planning to upgrade speakers that require more power
- When you want features like independent subwoofer control not offered by your factory system
Many audiophiles start by keeping the factory amp and upgrade later as budget allows.
Final Tips for Success
- Take photos of original wiring before disconnecting anything
- Label wires with masking tape before cutting
- Work methodically and test connections in stages
- Keep your original head unit in case you sell the vehicle
- Consider professional installation if you’re unsure about any steps
By following this guide, you can successfully integrate your new aftermarket stereo with your factory amplifier, saving money while upgrading your car audio experience. The key is understanding your specific vehicle system, getting the right adapter components, and making proper connections. With some patience and attention to detail, you’ll be enjoying better sound quality while maintaining the integrity of your factory audio system.
Happy listening!