Bypassing your car’s factory Bose amplifier can significantly improve your audio system’s capabilities, allowing for the installation of a higher-quality aftermarket head unit and potentially unlocking superior sound quality. However, this process requires careful planning and execution to avoid damaging your vehicle’s electrical system or speakers. This guide provides a step-by-step approach to safely bypass your Bose factory amplifier, ensuring a smooth and successful upgrade.
Contents
- Assessing Your Bose System’s Setup
- Identifying the Factory Amplifier Location
- Necessary Tools and Equipment Checklist
- Safely Disconnecting the Factory Amp
- Bypassing the Bose Amplifier: Step-by-Step
- Wiring the New Head Unit Directly
- Speaker Wire Connections and Polarity
- Testing the New Audio System Setup
- Troubleshooting Common Installation Issues
- Final Checks and System Optimization
Assessing Your Bose System’s Setup
Understanding your car’s Bose system configuration is crucial before starting the bypass. Check your owner’s manual to identify the specific Bose system installed in your vehicle. This will help determine the amplifier’s location and the type of connections used. Note the number of speakers, their locations, and whether your system includes a subwoofer. This information will be vital for proper wiring during the bypass process.
Take detailed photos or videos of the existing wiring harness before disconnecting anything. This documentation will be invaluable if you encounter problems during the installation or need to revert to the original configuration. Remember that Bose systems often use proprietary wiring and connectors, so understanding their layout beforehand will save you time and potential frustration.
Identifying the Factory Amplifier Location
The location of your Bose factory amplifier varies greatly depending on the vehicle’s make, model, and year. Common locations include the trunk, under the seats, or behind the dashboard. Consult your vehicle’s service manual or online forums dedicated to your car model for specific amplifier location information. Searching online using your vehicle’s year, make, model, and “Bose amplifier location” will often yield helpful results.
Once you’ve located the amplifier, carefully examine its connections and take detailed notes or photographs. Pay close attention to the wire colors and their corresponding functions. This detailed documentation will be crucial for accurately connecting your new head unit and speakers to the system. Remember, accuracy is paramount to avoid short circuits or damage to your components.
Necessary Tools and Equipment Checklist
Before beginning the bypass, gather the necessary tools and equipment. This includes a basic set of screwdrivers (Phillips and flathead), wire strippers/cutters, crimpers, electrical tape, a multimeter for testing continuity and voltage, and a wiring harness adapter (if needed) for your new head unit. You’ll also need the new head unit itself, speaker wire, and potentially a line output converter (LOC) if your new head unit lacks high-level inputs.
Additionally, consider having a helper to assist with holding components or feeding wires. Safety glasses and gloves are recommended to protect against accidental cuts or injuries. Having a clean, well-lit workspace will also significantly improve the efficiency and safety of the installation process. Proper organization of your tools and materials will minimize the risk of errors.
Safely Disconnecting the Factory Amp
Begin by disconnecting the negative terminal of your car battery to prevent electrical shocks and short circuits. This is a crucial safety precaution that should always be followed before working on any vehicle’s electrical system. Once the battery is disconnected, locate the amplifier and carefully disconnect all the wiring harnesses connected to it.
Take detailed pictures or create a wiring diagram before disconnecting each connector. Label each wire with its corresponding function to avoid confusion during the reconnection process. Use a wire label maker or masking tape and a marker to clearly identify each wire. This careful documentation will significantly simplify the reassembly process.
Bypassing the Bose Amplifier: Step-by-Step
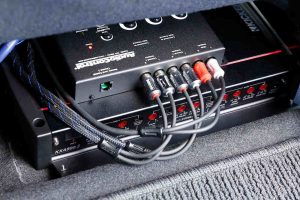
With the Bose amplifier disconnected, you’ll need to identify the speaker-level inputs and outputs on the amplifier’s wiring harness. These are typically high-level signals. If your new head unit accepts high-level inputs, you can connect the speaker wires directly from the head unit to the speaker wires that originally went to the Bose amplifier. This is the simplest bypass method.
However, most modern head units require low-level inputs. In this case, you’ll need a line output converter (LOC) to convert the high-level signals from the amplifier’s harness into low-level signals compatible with your new head unit. The LOC will usually have instructions on how to connect it to the high-level inputs and outputs of your system.
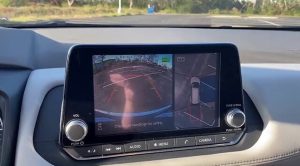
Wiring the New Head Unit Directly
Once the bypass is complete (either directly or via an LOC), connect the new head unit’s wiring harness to the vehicle’s wiring harness. This usually involves matching the appropriate wires based on the color codes provided in your head unit’s installation manual and your vehicle’s wiring diagram. Ensure that all connections are secure and well-insulated to prevent short circuits.
Double-check all connections before proceeding. Incorrect wiring can damage your head unit or vehicle’s electrical system. If you are unsure about any connection, consult your head unit’s manual or seek professional assistance. Take your time and carefully review each connection to ensure accuracy.
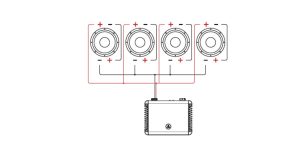
Speaker Wire Connections and Polarity
Connect the speaker wires from the head unit (or LOC) to the vehicle’s speakers. Pay close attention to speaker wire polarity. Incorrect polarity can result in poor sound quality or even speaker damage. Most speaker wire has a positive (+) and negative (-) designation, usually indicated by different colors (often red for positive and black for negative).
Match the polarity of the speaker wires from the head unit to the corresponding polarity of the vehicle’s speakers. Use a multimeter to verify polarity if needed. Double-check all connections to ensure correct polarity before turning on the system. Incorrect polarity can cause significant damage to your speakers.
Testing the New Audio System Setup
Reconnect the negative battery terminal. Turn on the ignition and test the new audio system. Check all speakers to ensure they are functioning correctly and producing sound. Listen for any distortion, buzzing, or other unusual noises. Adjust the head unit’s settings to optimize the sound quality.
If any issues arise, carefully review all connections and check for loose wires or incorrect polarity. Use a multimeter to test the voltage and continuity of the wiring. If the problem persists, consult your head unit’s manual or seek professional assistance. Systematic troubleshooting is essential for identifying and resolving any issues.
Troubleshooting Common Installation Issues
Common issues include no sound, distorted sound, or specific speakers not working. No sound often indicates a wiring problem or a faulty connection. Distorted sound can be caused by incorrect polarity, a ground loop, or a faulty speaker. Specific speakers not working may indicate a blown speaker, a broken wire, or a problem with the head unit’s output.
Use a multimeter to test for continuity in the wiring and to check the voltage at the speakers. If a speaker is not working, test it with a known good source to determine if the speaker itself is faulty. Troubleshooting requires a methodical approach, checking each component and connection systematically.
Final Checks and System Optimization
Once the system is functioning correctly, perform final checks to ensure all speakers are working properly and the sound quality is satisfactory. Fine-tune the head unit’s equalizer settings to optimize the sound to your preferences. Consider adding sound dampening material to reduce road noise and improve the overall audio experience.
After a period of use, re-check all connections to ensure they remain secure. Regular maintenance will help to prolong the lifespan of your new audio system. Enjoy your upgraded sound system!
Bypassing a factory Bose amplifier can be a rewarding upgrade, significantly enhancing your car audio experience. However, remember that this process involves working with your vehicle’s electrical system, so safety and careful attention to detail are paramount. Following these steps and troubleshooting effectively will help ensure a successful installation. If you are uncomfortable performing this task yourself, consider seeking professional assistance from a qualified car audio installer.