Want a louder, more powerful sound system in your car or home audio setup? Bridging your amps might be the answer! This beginner’s guide walks you through the process, explaining why you’d want to bridge amps, how to check compatibility, and the steps involved in safely wiring and testing your setup. Let’s dive in!
Contents
- Why Bother Bridging Your Amps?
- Understanding Amp Bridging Basics
- Checking Your Amps’ Compatibility
- Necessary Gear: What You’ll Need
- Wiring Your Amps for Bridged Mode
- The Crucial Step: Speaker Wiring
- Testing Your Bridged Amp Setup
- Troubleshooting Common Problems
- Getting the Best Sound from Your Setup
- Enjoying Your Powerful Bridged System
Why Bother Bridging Your Amps?
Bridging amplifiers significantly increases their power output. Instead of powering two speakers separately, you combine the power of two channels into one, creating a much stronger signal for a single speaker or subwoofer. This results in a noticeable boost in volume and a deeper, more impactful bass response, especially beneficial for subwoofers. Think of it like this: two smaller engines working together create the power of a much larger one.
Consequently, bridging allows you to achieve a higher level of audio fidelity with improved clarity and less distortion at higher volumes. This is because the increased power allows the speaker to work more efficiently, reducing strain and enhancing the overall sound quality. It’s a great way to maximize the potential of your existing amplifiers without having to buy a more powerful, and often more expensive, single unit.
Understanding Amp Bridging Basics
At its core, amp bridging involves connecting two amplifier channels in a way that they work in unison to drive a single speaker load. Instead of each channel producing its own separate signal, they combine their power to create a single, more powerful output. This is achieved by wiring the channels in a specific way, effectively doubling the voltage and power delivered to the speaker.
However, it’s important to understand that bridging isn’t simply a matter of connecting the outputs together. Incorrect wiring can severely damage your amplifiers and speakers. Therefore, carefully following the instructions and understanding the principles involved is crucial for a successful and safe bridging operation. We’ll cover the specifics in the following sections.
Checking Your Amps’ Compatibility
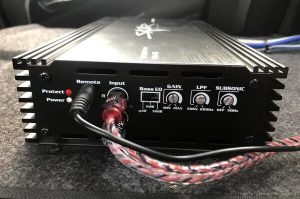
Before you even think about grabbing your wire strippers, ensure your amplifiers are compatible with bridging. Not all amplifiers are designed for this, and attempting to bridge an incompatible amp can lead to immediate and irreparable damage. Check your amplifier’s manual—it should clearly state whether bridging is supported and specify the impedance requirements for bridged mode. Look for a section on “bridged mode,” “mono mode,” or “parallel mode.”
Furthermore, pay close attention to the impedance ratings. Bridging typically requires a higher impedance speaker than when using the amp in stereo mode. For example, an amp that’s stable at 2 ohms per channel in stereo mode might only be stable at 4 ohms or higher when bridged. Mismatching impedance can lead to overheating and damage to the amplifier. Always prioritize safety and consult your amp’s manual.
Necessary Gear: What You’ll Need
To bridge your amps, you’ll need a few essential tools and materials. First, you’ll need a good quality set of speaker wire, preferably thicker gauge wire (like 8-gauge or 10-gauge) to handle the increased current. Thinner wire will create more resistance and could overheat. You’ll also need wire strippers to properly prepare the wire ends for connection.
In addition, you’ll need appropriate connectors, such as banana plugs or ring terminals, to securely connect the wires to your amplifier and speaker. A multimeter is highly recommended to verify the connections and ensure the impedance is correct. Finally, have some electrical tape on hand to secure any connections and prevent accidental shorts. Having these items ready will make the process much smoother.
Wiring Your Amps for Bridged Mode
The specific wiring configuration for bridging amps varies slightly depending on the amplifier model. However, the general principle remains the same. You’ll typically connect the positive (+) terminal of one channel to the positive (+) terminal of the other channel. Then, you’ll connect the negative (-) terminal of one channel to the positive (+) terminal of your speaker. Finally, you’ll connect the negative (-) terminal of your speaker to the negative (-) terminal of the other channel.
Moreover, always consult your amplifier’s manual for the precise bridging instructions. Some amplifiers might use different terminal labels or have specific bridging configurations. Take your time, double-check your connections, and ensure everything is secure before powering on your system. Rushing this step can lead to costly mistakes.
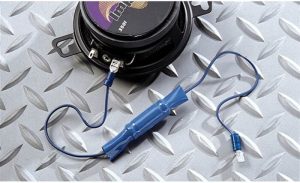
The Crucial Step: Speaker Wiring
Connecting the speaker to the bridged amplifier is equally critical. The impedance of your speaker must match the amplifier’s bridged impedance rating. Using a speaker with an incorrect impedance can severely damage your amplifier. Always double-check the specifications of both your amplifier and speaker before making any connections. Mismatched impedance is a common cause of blown amplifiers.
Similarly, ensure that you’re using a speaker that can handle the increased power output of the bridged amplifier. A speaker rated for less power than the bridged amplifier’s output will likely be damaged. Choose a speaker that’s more than capable of handling the increased power to avoid any issues. Safety and proper matching are key here.
Testing Your Bridged Amp Setup
Before cranking up the volume, perform a careful test. Start with the volume at a very low level and gradually increase it. Listen for any unusual sounds like crackling, buzzing, or distortion. These could indicate a problem with the wiring or a mismatch in impedance. If you hear any of these sounds, immediately turn off the system and check your connections.
Furthermore, monitor the temperature of your amplifiers. Overheating is a common sign of a problem, whether it’s a wiring issue, impedance mismatch, or a faulty component. If the amplifiers get excessively hot, turn them off immediately and troubleshoot the problem before continuing. Your safety and the lifespan of your equipment depend on careful testing and monitoring.
Troubleshooting Common Problems
If you encounter problems after bridging your amps, the most common culprits are wiring errors and impedance mismatches. Double-check all your connections, ensuring that the positive and negative wires are connected correctly and securely. Use your multimeter to verify the impedance of your speaker and ensure it matches the amplifier’s bridged mode specification.
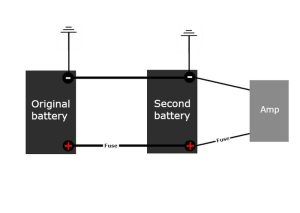
Additionally, blown fuses are another common issue. Check your amplifier’s fuse and replace it with a fuse of the correct rating if it’s blown. Overheating is another potential problem, often caused by impedance mismatches or other wiring errors. Allow the amplifiers to cool down before attempting to diagnose the problem further. Remember, safety always comes first.
Getting the Best Sound from Your Setup
Once you’ve successfully bridged your amps and confirmed everything is working correctly, you can fine-tune your setup for optimal sound quality. Experiment with different EQ settings to find the best balance between bass, mids, and highs. The increased power output from bridging will allow you to achieve a much more refined and powerful sound.
In addition, consider the placement of your speaker(s) to optimize the sound dispersion. The acoustics of your room will significantly impact the overall sound quality. Experiment with different placements to find the sweet spot. With a little experimentation, you can achieve a truly impressive sound.
Enjoying Your Powerful Bridged System
After all the hard work, it’s time to enjoy the fruits of your labor! You’ve successfully bridged your amplifiers and should now be experiencing a significant increase in power and sound quality. Listen to your favorite music and marvel at the improved bass response and overall clarity. The effort was well worth it!
Finally, remember to always respect the limits of your equipment. While bridging significantly increases power, it’s still crucial to avoid pushing your system beyond its capabilities. Overdriving your system can lead to damage, so always listen at safe and responsible volume levels. Enjoy the powerful audio experience responsibly.
Bridging your amps can significantly enhance your audio experience, offering a powerful and impactful sound. However, it’s crucial to understand the process, check compatibility, and follow the safety guidelines meticulously. By following the steps outlined in this guide, you can safely and successfully bridge your amplifiers and enjoy the benefits of a much more powerful and impressive sound system. Remember to always consult your amplifier’s manual for specific instructions and safety precautions. Happy listening!