So you’ve got a shiny new JVC KD-S31BT car stereo and you’re ready to rock? Awesome! But before you crank up the volume, you’ll need to conquer the wiring. This guide will walk you through the process of installing your {title}, step-by-step, making it easier than you think. We’ll decode the wiring harness, match the colors, and troubleshoot any potential problems. Let’s get started!
Contents
- Decoding the DEH-S31BT’s Wiring
- Finding Your Car Stereo’s Wires
- Matching Wires: Color Codes Explained
- Powering Up Your DEH-S31BT
- Connecting Speakers: A Simple Guide
- Harnessing the Remote Turn-On Wire
- Antenna Connection: Getting the Signal
- Illumination Wire: Matching the Dash
- Troubleshooting Common Wiring Issues
- Finishing Up: Enjoy Your Music!
Decoding the DEH-S31BT’s Wiring
The first step in installing your JVC KD-S31BT is understanding its wiring harness. This harness is a bundle of wires that connect your stereo to your car’s electrical system. You’ll find a detailed wiring diagram in your stereo’s instruction manual. This diagram shows each wire’s function and color code. Take your time studying it; it’s your roadmap to success! Don’t be intimidated by the sheer number of wires; they are organized logically.
Furthermore, familiarize yourself with the different types of wires – power wires (carrying the juice), speaker wires (for the audio), and control wires (like the remote turn-on). Understanding these categories will help you quickly identify each wire’s purpose during the installation process. Remember, accuracy is key to avoid damaging your car or your new stereo.
Finding Your Car Stereo’s Wires
Next, you need to locate your car’s existing stereo wiring harness. This is usually behind the radio fascia, which you’ll need to remove carefully. Consult your car’s owner’s manual for instructions on removing the fascia; this often involves using trim removal tools to avoid scratching the dash. Once you’ve accessed the harness, you’ll see a bunch of wires, likely with color-coded connectors.
However, these wires might be tucked away, making it tricky to find them. A flashlight can be your best friend here! If your car’s previous stereo used a different wiring harness, you might need an adapter. These adapters are readily available at most auto parts stores and make the connection process much smoother. Take pictures before disconnecting anything to help with reassembly later.
Matching Wires: Color Codes Explained
Now comes the crucial part: matching the wires from your JVC KD-S31BT’s harness to your car’s harness. Refer to both the JVC KD-S31BT’s wiring diagram and your car’s wiring diagram (if available). Color codes are your guide. For example, the power wire is usually red (+12V), the ground wire is usually black, and the illumination wire is often a blue or blue/white wire.
Moreover, pay close attention to the details. Some wires might have slightly different color combinations or might use stripes to differentiate them. Double-check each connection before moving on. If you’re unsure about a particular wire, it’s always best to err on the side of caution and double-check with the diagrams or consult an online forum dedicated to car audio installations. A small mistake can lead to a big problem.
Powering Up Your DEH-S31BT
With the wires matched, it’s time to connect the power wires. This is where accuracy is paramount. Connect the red (+12V) wire to your car’s constant power source. The yellow (+12V switched) wire goes to your car’s switched power source (this turns the stereo on and off with the ignition). Finally, the black wire (ground) needs a secure connection to a clean metal surface in your car’s chassis.
In addition, ensure your connections are clean and secure. Loose connections can lead to intermittent power issues, resulting in your stereo cutting out unexpectedly. Use crimp connectors or solder for the most reliable connections. Always disconnect the battery’s negative terminal before starting any electrical work to prevent short circuits and potential damage.
Connecting Speakers: A Simple Guide
Connecting your speakers is relatively straightforward. The JVC KD-S31BT’s wiring diagram will show you which wires correspond to each speaker (front left, front right, rear left, rear right). Match these wires to the corresponding wires on your speakers. Make sure to observe the correct polarity (+ and -); connecting them incorrectly can result in a weak or distorted sound.
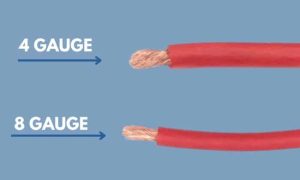
Specifically, use speaker wire of appropriate gauge for your speakers’ power handling. Too thin a wire can lead to power loss and distortion. Secure the speaker wire connections using proper crimp connectors or soldering. Once connected, test each speaker individually to ensure they’re working correctly and that the sound is clear and balanced.
Harnessing the Remote Turn-On Wire
The remote turn-on wire (usually blue) allows your stereo to turn on and off with other accessories, such as an amplifier. Connect this wire to your car’s accessory power source, which turns on when you turn the ignition key. This ensures that your stereo only draws power when your car is running.
Consequently, if you have an amplifier, you’ll need to connect the remote turn-on wire from your stereo to the remote turn-on input on your amplifier. This ensures that both your stereo and amplifier turn on and off simultaneously. If you don’t have an amplifier, you can usually leave this wire unconnected.
Antenna Connection: Getting the Signal
To receive radio signals, you’ll need to connect the antenna wire. This is usually a coaxial cable. Carefully connect the antenna wire from your car to the antenna input on your JVC KD-S31BT. Ensure a secure connection to avoid signal loss or interference.
Subsequently, a loose connection can significantly reduce the quality of your radio reception. If your reception is poor after installation, check the antenna connection first. Make sure the antenna wire is properly seated and that there are no breaks or damage to the cable.
Illumination Wire: Matching the Dash
The illumination wire (often blue/white or blue) controls the brightness of your stereo’s display. Connect this wire to your car’s illumination circuit. This will make your stereo’s display match the brightness of your car’s dashboard lights.
Therefore, this creates a visually consistent look inside your car. If you don’t connect the illumination wire, your stereo’s display might be too bright or too dim, depending on the time of day. This wire is usually low voltage, so don’t worry about accidentally causing damage.
Troubleshooting Common Wiring Issues
If your stereo isn’t working after installation, don’t panic! First, double-check all your connections. Make sure all the wires are securely connected and that the polarity is correct. A loose connection or incorrect polarity is the most common cause of problems.
Furthermore, if you’re still having issues, check your fuses. Both your car’s fuses and the fuse in your stereo itself could be blown. Replace any blown fuses with the correct amperage rating. If the problem persists, consult your JVC KD-S31BT’s manual or seek help from a professional car audio installer.
Finishing Up: Enjoy Your Music!
Once you’ve successfully connected all the wires and tested everything, it’s time to enjoy your new JVC KD-S31BT! Carefully put your car’s fascia back in place. Take a moment to admire your handiwork. Now, turn on the ignition, and let the music fill your car!
In conclusion, installing your new stereo might seem daunting at first, but by following these steps and taking your time, you can successfully install your JVC KD-S31BT and enjoy your favorite tunes. Remember, patience and attention to detail are key. Happy listening!