Transforming your Ford Crown Victoria into a rolling concert hall starts with a killer subwoofer setup. The Crown Vic, a full-size sedan with a spacious interior and a reputation for durability, offers the perfect canvas for a booming audio system. Whether you’re cruising through the city or hitting the highway, a well-installed subwoofer delivers deep, rich bass that elevates your music experience. This guide walks you through every step of setting up a subwoofer in your Crown Vic, from choosing the right equipment to fine-tuning the sound. Let’s dive in and create an audio setup that turns heads.
Contents
- Why Upgrade Your Crown Vic’s Audio with a Subwoofer?
- Choosing the Right Subwoofer for Your Crown Vic
- Essential Components for Your Crown Vic Subwoofer Setup
- Step-by-Step Guide to Installing a Subwoofer in Your Crown Vic
- Optimizing Your Crown Vic’s Subwoofer Performance
- Common Mistakes to Avoid
- Budget vs. Premium Subwoofer Setups for Your Crown Vic
- Enhancing Your Crown Vic’s Audio Beyond the Subwoofer
- Legal Considerations for Loud Audio Systems
- Troubleshooting Common Subwoofer Issues
- Why the Crown Vic Is Perfect for Subwoofer Upgrades
- Conclusion
Why Upgrade Your Crown Vic’s Audio with a Subwoofer?
A subwoofer adds depth to your music, bringing out the low-frequency sounds that factory speakers often miss. The Crown Vic’s stock audio system, while functional, lacks the punch needed for genres like hip-hop, EDM, or rock. Installing a subwoofer enhances your listening experience by delivering powerful bass you can feel. Beyond sound quality, a custom audio setup boosts your car’s vibe, making every drive more enjoyable. With the right setup, your Crown Vic becomes a mobile soundstage, perfect for impressing friends or enjoying solo jam sessions.
Choosing the Right Subwoofer for Your Crown Vic
Selecting a subwoofer involves balancing size, power, and space. The Crown Vic’s large trunk provides ample room for various subwoofer sizes, but your choice depends on your music preferences and budget. Here’s a breakdown of key factors to consider:
Subwoofer Size
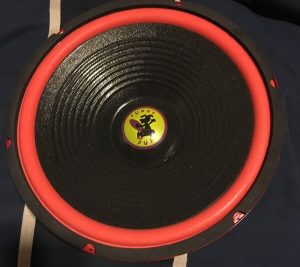
Subwoofers come in sizes like 8, 10, 12, and 15 inches. For the Crown Vic, 10-inch or 12-inch subwoofers strike a great balance between powerful bass and trunk space. A 12-inch subwoofer, like the JL Audio 12W0v3-4, delivers strong low-end output without overwhelming the car’s interior. If you want earth-shaking bass, a 15-inch model works, but it eats up more trunk space.
Power Handling
Check the subwoofer’s RMS (Root Mean Square) rating, which indicates how much power it can handle continuously. For a Crown Vic, a subwoofer with 250-500 watts RMS suits most setups. Pair it with an amplifier that matches or slightly exceeds the subwoofer’s RMS rating for optimal performance.
Enclosure Type
Subwoofers need an enclosure to perform well. Sealed enclosures produce tight, accurate bass, ideal for rock or jazz. Ported enclosures, on the other hand, create louder, booming bass, perfect for hip-hop or EDM. For the Crown Vic, a sealed box fits easily in the trunk and complements the car’s acoustics.
Single vs. Dual Subwoofers
One subwoofer often suffices for a balanced sound. However, dual subwoofers, like a pair of 10-inch Kicker CompRs, amplify the bass for a more intense experience. Consider your budget and trunk space before opting for two.
Essential Components for Your Crown Vic Subwoofer Setup
Beyond the subwoofer, you’ll need additional gear to complete the system. Each component plays a critical role in delivering clean, powerful sound.
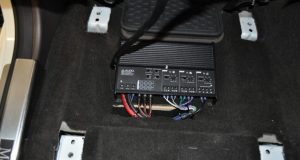
Amplifier
An amplifier powers your subwoofer, ensuring it hits hard without distortion. Choose a mono or Class D amplifier, like the Rockford Fosgate R500X1D, for efficiency and strong bass output. Match the amp’s RMS rating to your subwoofer’s for the best results.
Wiring Kit
A high-quality wiring kit ensures safe and efficient power delivery. Look for a 4-gauge kit with a fuse holder, power cable, ground cable, and RCA cables. Brands like NVX or KnuKonceptz offer reliable options.
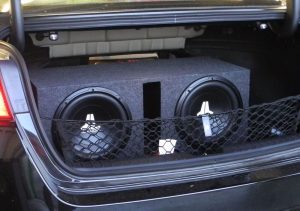
Subwoofer Enclosure
If your subwoofer doesn’t come with an enclosure, buy or build one that fits your trunk. Measure the available space in your Crown Vic’s trunk (typically around 18.7 cubic feet) to ensure a snug fit. Pre-built enclosures save time, but custom boxes allow precise tuning.
Sound Deadening Material
The Crown Vic’s trunk can rattle with heavy bass. Apply sound deadening mats, like Dynamat or Noico, to the trunk lid, floor, and walls to reduce vibrations and improve sound clarity.
Step-by-Step Guide to Installing a Subwoofer in Your Crown Vic
With your components ready, it’s time to install the subwoofer system. Follow these steps for a clean, professional setup. Always disconnect your car’s battery before starting to avoid electrical issues.
Step 1: Plan Your Layout
Decide where to place the subwoofer and amplifier. The trunk is the go-to spot for the subwoofer, while the amplifier can mount on the trunk wall or under a seat. Ensure the subwoofer enclosure fits securely and doesn’t slide during turns. Sketch a wiring path from the battery to the trunk, avoiding sharp edges or moving parts.
Step 2: Install the Amplifier
Mount the amplifier in a well-ventilated area with enough clearance for cooling. Secure it to the trunk floor or wall using screws or brackets. Ground the amplifier by connecting the ground wire to a clean, unpainted metal surface within 18 inches of the amp.
Step 3: Run the Power and Signal Cables
Run the power cable from the car’s battery through the firewall to the trunk. Use a grommet to protect the cable where it passes through the firewall. Connect the power cable to the amplifier’s positive terminal. Next, run RCA cables from your head unit to the amplifier for the audio signal. Keep RCA cables away from power cables to prevent interference.
Step 4: Connect the Subwoofer
Place the subwoofer enclosure in the trunk and secure it to prevent movement. Connect the subwoofer to the amplifier using speaker wire. Double-check the wiring polarity (positive to positive, negative to negative) to ensure proper sound output.
Step 5: Apply Sound Deadening
Install sound deadening material to the trunk’s interior surfaces. Focus on areas prone to vibration, like the trunk lid and rear deck. This step minimizes rattles and enhances bass quality.
Step 6: Test and Tune
Reconnect the battery and turn on your audio system. Play a bass-heavy track to test the subwoofer. Adjust the amplifier’s gain, crossover, and bass boost settings to achieve a balanced sound. The crossover should filter out high frequencies, letting the subwoofer focus on bass (typically 80-120 Hz).
Optimizing Your Crown Vic’s Subwoofer Performance
After installation, fine-tune your system to get the most out of your subwoofer. Here are some tips to maximize performance:
Adjust the Phase
Set the amplifier’s phase switch to align the subwoofer’s output with your car’s other speakers. Test both 0 and 180 degrees to find the setting with the fullest bass.
Balance the Sound
Ensure the subwoofer complements, not overpowers, your mids and highs. Adjust the head unit’s equalizer to blend the bass with the rest of the audio. If the bass feels too boomy, lower the gain or tweak the crossover.
Maintain Your System
Check wiring connections periodically to prevent loose cables or corrosion. Clean the subwoofer cone gently with a soft cloth to remove dust. Regular maintenance keeps your system sounding crisp.
Common Mistakes to Avoid
Even seasoned installers make errors. Steer clear of these pitfalls to ensure a smooth setup:
- Overloading the Electrical System: A high-powered subwoofer can strain your Crown Vic’s alternator. Upgrade to a high-output alternator or add a capacitor if you notice dimming headlights.
- Poor Grounding: A weak ground connection causes noise or power issues. Always ground the amplifier to bare metal.
- Skipping Sound Deadening: Without sound deadening, your trunk will rattle, muddying the bass.
- Mismatched Components: Pair your subwoofer and amplifier carefully. An underpowered amp won’t drive the subwoofer effectively, while an overpowered one risks damage.
Budget vs. Premium Subwoofer Setups for Your Crown Vic
You don’t need to break the bank for great sound. Here’s a comparison of budget and premium setups for your Crown Vic:
Budget Setup (Under $300)
- Subwoofer: Pioneer TS-WX1210A (12-inch, 300W RMS, built-in amp)
- Wiring Kit: Rockville RWK81 8-gauge kit
- Enclosure: Included with the subwoofer
- Total Cost: ~$250
This setup delivers solid bass for casual listeners without complex installation.
Premium Setup ($800-$1,200)
- Subwoofer: JL Audio 12W3v3-4 (12-inch, 500W RMS)
- Amplifier: Alpine BBX-T600 (600W mono)
- Wiring Kit: NVX 4-gauge kit
- Enclosure: Custom sealed box
- Sound Deadening: Dynamat Xtreme
- Total Cost: ~$1,000
This high-end system offers competition-level sound quality with deep, precise bass.
Enhancing Your Crown Vic’s Audio Beyond the Subwoofer
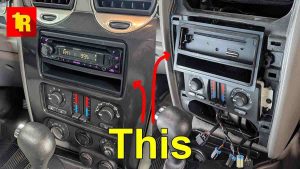
A subwoofer lays the foundation, but upgrading other components takes your audio to the next level. Replace factory speakers with coaxial or component speakers from brands like Focal or Hertz for clearer mids and highs. Add a digital signal processor (DSP) to fine-tune the soundstage. If your head unit lacks Bluetooth or modern features, upgrade to a touchscreen model with Apple CarPlay or Android Auto.
Legal Considerations for Loud Audio Systems
Before cranking up the bass, check local noise ordinances. Some areas impose fines for excessively loud car audio. Keep the volume reasonable in residential areas to avoid trouble. If you compete in car audio events, ensure your setup complies with event rules.
Troubleshooting Common Subwoofer Issues
If your subwoofer isn’t performing as expected, try these fixes:
- No Sound: Check all connections, fuses, and the amplifier’s power light. Ensure the head unit’s subwoofer output is enabled.
- Distorted Bass: Lower the gain or bass boost. Verify the subwoofer isn’t overpowered.
- Rattling Noises: Apply more sound deadening or secure loose trunk items.
Why the Crown Vic Is Perfect for Subwoofer Upgrades
The Crown Vic’s spacious trunk and sturdy build make it an ideal candidate for audio upgrades. Its boxy design minimizes sound distortion, and the large cabin amplifies bass response. Whether you own a 1990s model or a later 2000s version, the Crown Vic handles subwoofer installations with ease.
Conclusion
Upgrading your Crown Vic with a subwoofer transforms your driving experience, delivering heart-pounding bass that makes every song come alive. By choosing the right subwoofer, amplifier, and enclosure, and following a careful installation process, you’ll create a custom audio system that rivals professional setups. Take your time, tune the system, and enjoy the ride with music that hits all the right notes. Ready to start? Grab your tools, pick your gear, and let your Crown Vic roar with sound.