As an Amazon Influencer, we earn from qualifying purchases you might make if you click any of the links or buttons on this page at no expense to you.
So you’ve got a powerful 4-channel amplifier and a couple of thumping subwoofers, but you’re not sure how to get the most out of your setup? Bridging your amp is the answer! This beginner’s guide will walk you through the process of bridging a 4-channel amp to power two subwoofers, ensuring you get that deep, chest-thumping bass you crave. We’ll cover everything from understanding your equipment to troubleshooting potential problems, making sure you’re rocking out in no time. Let’s dive in!
Contents
- Understanding Your 4-Channel Amp
- Identifying Your Subwoofer Specs
- The Bridge Mode: A Quick Overview
- Wiring for Mono Output: Step-by-Step
- Connecting the Positive Terminals
- Grounding Your Subwoofer System
- Securing Connections: Tips & Tricks
- Testing Your Bridged Amp Setup
- Troubleshooting Common Problems
- Enjoying Your Boosted Bass!
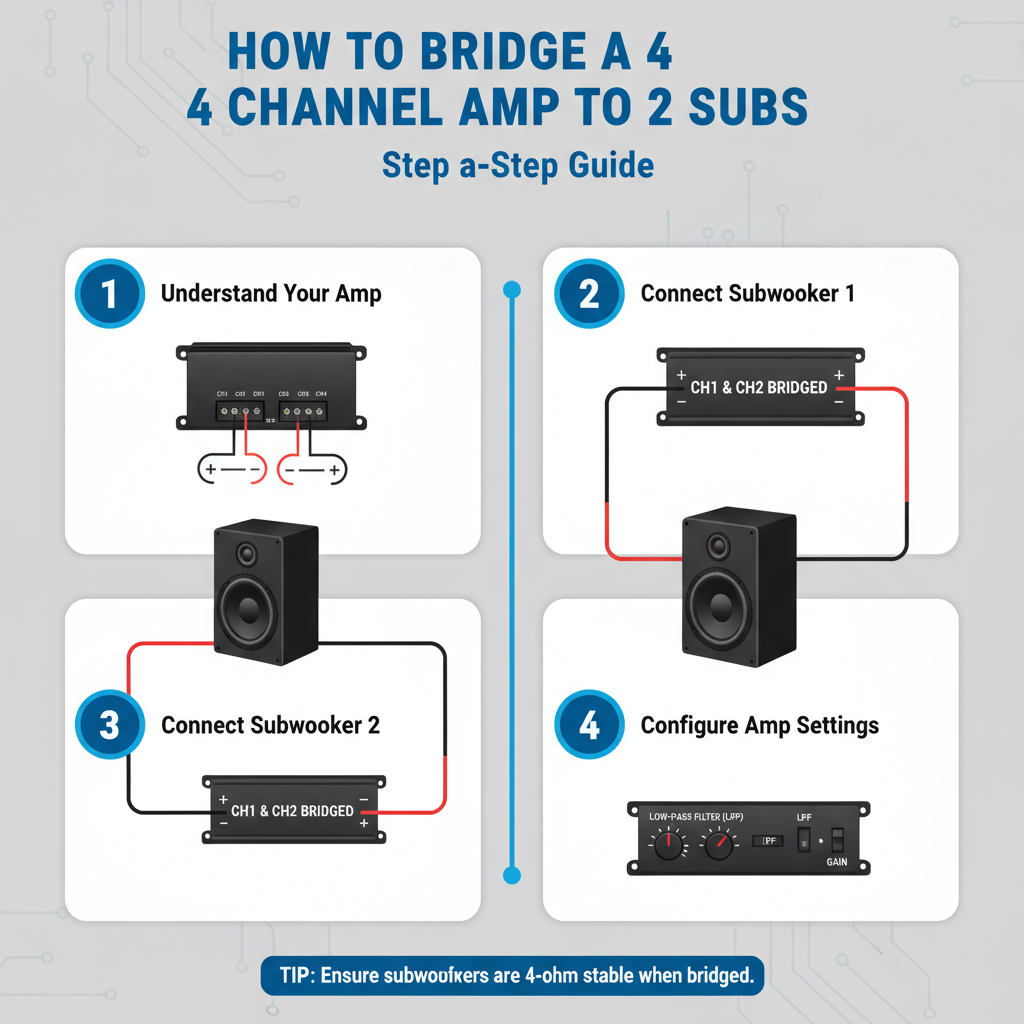
Understanding Your 4-Channel Amp
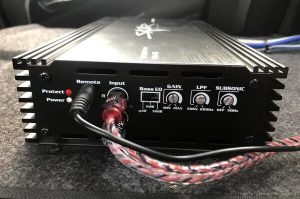
A 4-channel amplifier, as its name suggests, has four channels of amplification. Each channel can independently power a speaker. However, many 4-channel amps offer a bridging option, allowing you to combine two channels into one more powerful channel. This increases the power output significantly, perfect for driving those demanding subwoofers. Before you start, carefully read your amplifier’s manual. It will specify the bridging procedure, the maximum power output in bridged mode, and any specific wiring diagrams. Pay close attention to these instructions; they are crucial for safe and effective operation.
This information is essential because different amps have different bridging procedures and power output capabilities. Some amps might require specific jumpers or switches to activate the bridge mode, while others might automatically bridge when you connect the channels in a certain way. Understanding your amp’s capabilities will prevent potential damage to your equipment and ensure you get the best possible sound quality.
Identifying Your Subwoofer Specs
Before you even think about connecting anything, check your subwoofer specifications. This is vital for matching your amplifier’s output to your subwoofer’s requirements. Look for the impedance rating (usually 2 ohms, 4 ohms, or 8 ohms) and the power handling capacity (measured in watts RMS). This information will tell you how much power your subs can safely handle without damage. Mismatching impedance can severely damage your amplifier, while exceeding the power handling capacity can blow your subwoofers. Take your time to carefully read the labels on your subs and their manuals.
Furthermore, knowing the subwoofer’s sensitivity (measured in dB) can help you understand how efficiently it converts power into sound. A higher sensitivity rating means the subwoofer will produce louder sound with less power. This information, combined with your amplifier’s specifications, will help you optimize your system for the best sound quality and prevent any potential damage. Don’t skip this step; it’s crucial for a successful and safe installation.
The Bridge Mode: A Quick Overview
Bridging your amplifier combines two channels into a single, more powerful channel. Instead of each channel delivering a portion of the signal, the two channels work in unison to produce a much higher power output. This increased power is ideal for subwoofers, which require significant power to reproduce low frequencies effectively. Think of it as doubling down on your amplifier’s power for those deep bass notes. Remember that bridging typically changes the impedance requirements. For example, bridging two 4-ohm channels might result in a 4-ohm bridged output or an 8-ohm bridged output, depending on the amp. Consult your amp’s manual to verify.
Consequently, bridging reduces the number of channels available. In this case, you’ll be using two channels of your 4-channel amp to power both subwoofers in mono. This means both subwoofers will receive the same signal, resulting in a more unified and powerful bass response. However, remember that you lose the ability to power other speakers from those two bridged channels.
Wiring for Mono Output: Step-by-Step
Now for the fun part – the actual wiring! First, make sure your amp is turned off and unplugged from the power source. Safety first! Next, you’ll need to connect the positive (+) terminals of both subwoofers to one of the bridged channels on your amplifier. This is usually done by connecting the positive terminal of one subwoofer to the positive output of one channel and the positive terminal of the other subwoofer to the positive output of the second channel (which will be bridged to the first). This will deliver the same signal to both subs. Your amp manual should have a diagram illustrating the correct connections for bridging.
Subsequently, you need to connect the negative (-) terminals of both subwoofers together, and then connect this combined negative to the negative output of the bridged channel. This creates a complete circuit, ensuring the signal flows correctly to your subwoofers. Using high-quality speaker wire of the appropriate gauge is crucial to avoid signal loss and ensure safe operation. Make sure the wires are tightly secured to the terminals to prevent any loose connections that could lead to audio problems or even damage.
Connecting the Positive Terminals
Connecting the positive (+) terminals correctly is critical for a successful installation. Begin by identifying the positive (+) outputs of the two channels you intend to bridge. Your amplifier’s manual will clearly indicate these terminals. Use appropriately sized speaker wire to connect one subwoofer’s positive terminal to one of the positive outputs of the channels you’re bridging. Securely fasten the wire to the terminal using the appropriate connectors.
Then, connect the second subwoofer’s positive terminal to the other positive output of the bridged channels. Ensure the connections are tight and secure, avoiding any loose wires that could cause intermittent audio problems or short circuits. Remember, a clean and organized wiring job not only improves the aesthetics but also helps in troubleshooting any potential issues later. Use appropriately colored wire to help you identify positive and negative connections.
Grounding Your Subwoofer System
Grounding is often overlooked but is crucial for optimal performance and safety. A proper ground connection provides a return path for the electrical signal, preventing noise and hum. Find a clean, bare metal surface on your car’s chassis – usually a bolt or screw on the metal frame – to use as your ground point. Make sure the surface is clean to ensure a good electrical connection. Use a heavy-gauge wire to connect the negative (-) terminal of your amplifier to this ground point.
Moreover, ensure the ground wire is securely fastened to both the amplifier and the chassis. A loose ground connection can lead to noise, hum, or even damage to your amplifier. Use a ring terminal or similar connector to ensure a secure and reliable connection. A good ground is the foundation of a clean and powerful audio system. Don’t underestimate the importance of this step.
Securing Connections: Tips & Tricks
Once you’ve made all your connections, take a moment to inspect your work. Make sure all wires are securely fastened to the terminals. Loose connections can cause intermittent audio problems, signal loss, or even damage to your equipment. Use wire ties or zip ties to neatly bundle and secure the wires, preventing them from getting tangled or snagged. This also keeps your installation looking professional and helps with future maintenance.
Furthermore, consider using heat-shrink tubing on your wire connections to protect them from moisture and abrasion. This adds an extra layer of protection and makes your installation more durable. Labeling your wires with their purpose can also be helpful, especially if you need to work on your system later. This simple step can save you a lot of time and frustration in the long run.
Testing Your Bridged Amp Setup
Before turning up the volume, perform a quick test. Connect your amplifier to a power source, but keep the volume low. Turn on your amplifier and source unit. Gradually increase the volume, listening for any unusual noises like crackling, popping, or hum. If you hear any of these, immediately turn off the system and check your connections.
If everything sounds clean and clear, you can slowly increase the volume to your desired level. Always start low and gradually increase the volume to avoid damaging your speakers or amplifier. Listen for any distortion or clipping; if you hear these, reduce the volume to prevent damage. Proper testing is essential for ensuring your system is functioning correctly and safely.
Troubleshooting Common Problems
If you encounter problems, don’t panic! Here are some common issues and their solutions: No sound: Check all connections, ensure the amp is turned on and properly grounded. Distorted sound: Reduce the volume, check for clipping, ensure the impedance matches. Hum or noise: Check the ground connection, ensure all wires are properly shielded. Amplifier overheating: Ensure proper ventilation, check for overload.
Always consult your amplifier and subwoofer manuals for specific troubleshooting advice. If the problem persists after checking these things, seek assistance from a professional car audio installer. Remember, safety is paramount. Don’t attempt repairs beyond your skill level.
Enjoying Your Boosted Bass!
Congratulations! You’ve successfully bridged your 4-channel amplifier to power two subwoofers. Now it’s time to sit back, relax, and enjoy the deep, powerful bass that your upgraded system delivers. Remember to listen at safe and responsible levels to protect your hearing and your equipment. Experiment with different EQ settings to fine-tune the sound to your liking.
Remember that maintaining your car audio system is crucial for longevity. Regularly check your connections and ensure everything is securely fastened. With a little care and attention, you can enjoy your boosted bass for years to come. Happy listening!
Bridging a 4-channel amp to power two subwoofers is a rewarding experience, significantly enhancing your car audio system’s bass response. By following this guide and taking your time, you can achieve a powerful, clean sound. Remember to prioritize safety