As an Amazon Influencer, we earn from qualifying purchases you might make if you click any of the links or buttons on this page at no expense to you.
Upgrading your car’s audio system with tweeters can significantly enhance the high-frequency sounds, resulting in a clearer, more detailed listening experience. This beginner’s guide will walk you through the entire process of installing tweeters in your car, from assessing your existing system to making final adjustments. Whether you’re a seasoned car audio enthusiast or a complete novice, this step-by-step guide will empower you to tackle this project confidently. Let’s get started!
Contents
- Assessing Your Car’s Audio System
- Choosing the Right Tweeters for Your Car
- Planning Your Tweeter Installation Location
- Gathering Necessary Tools and Materials
- Preparing the Tweeter Mounting Area
- Installing the Tweeter Mounting Brackets
- Connecting the Tweeters to the Amplifier
- Running Wiring and Making Connections
- Testing Tweeter Sound and Adjustments
- Finalizing the Installation and Clean-up
Assessing Your Car’s Audio System
Before you even think about buying tweeters, you need to understand your car’s existing audio setup. First, identify the head unit – is it a factory-installed system or an aftermarket one? This will influence your wiring choices and the overall complexity of the installation. Secondly, check the power output of your head unit or amplifier. Tweeters require a specific power range; exceeding this can damage them, while insufficient power will result in weak sound. Pay close attention to the impedance of your existing speakers and the planned tweeters to ensure compatibility. Mismatched impedances can lead to distorted sound or damage to your components.
Furthermore, consider the overall condition of your car’s audio system. Are there any existing issues with the wiring or speakers? Addressing these problems before installing tweeters will prevent future complications and ensure optimal sound quality. If you’re unsure about any aspect of your car’s audio system, consulting a professional car audio installer is always a wise option. They can provide expert advice and ensure a safe and effective installation.
Choosing the Right Tweeters for Your Car
Selecting the appropriate tweeters is crucial for achieving the desired sound quality. First, consider the size of the tweeters. Common sizes include 1-inch, 3/4-inch, and even smaller. The size will dictate the mounting location and the overall aesthetic integration into your car’s interior. Next, think about the tweeter’s power handling capabilities. Ensure the tweeters can handle the power output of your head unit or amplifier to prevent damage. Don’t just look at the wattage; consider the sensitivity rating too – higher sensitivity means louder sound with less power.
Moreover, explore different tweeter types. Dome tweeters are common and offer a balanced sound, while horn tweeters provide a more directional and powerful high-frequency response. Read reviews and compare specifications from reputable brands to find tweeters that fit your budget and sound preferences. Remember that the best tweeter for you depends on your personal listening habits and the overall sound signature you want to achieve in your car. Investing in quality tweeters will yield a much more satisfying result in the long run.
Planning Your Tweeter Installation Location
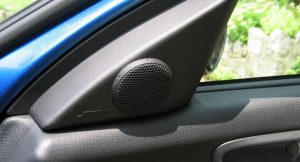
The placement of your tweeters greatly impacts the soundstage and overall listening experience. Ideally, tweeters should be positioned at ear level for optimal sound projection. This often means mounting them in the A-pillars, dashboard, or door panels, depending on your car’s design. However, you need to carefully consider the visibility of the tweeters. You might prefer a discreet installation, blending the tweeters seamlessly with the car’s interior. Conversely, some people prefer a more prominent display of their upgraded audio components.
Consequently, visualize the placement before drilling any holes. Use masking tape to mark potential locations and step back to assess the aesthetics. Take measurements to ensure the tweeters fit comfortably and securely in the chosen location. Avoid placing them too close to reflective surfaces, which can cause sound distortion. Remember, proper planning prevents costly mistakes and ensures a professional-looking installation. Take your time with this step; a well-planned installation will make the rest of the process much smoother.
Gathering Necessary Tools and Materials
Before you begin the installation, gather all the necessary tools and materials. This will streamline the process and prevent interruptions. You’ll need a drill with appropriate drill bits for the mounting screws, a wire stripper/cutter, soldering iron and solder (or crimp connectors), electrical tape, and a multimeter to check wiring continuity. Additionally, you’ll need mounting brackets (if not included with the tweeters), screws, and potentially some sound-deadening material to reduce vibrations.
Furthermore, gather any specialized tools that may be required based on your car’s interior and the tweeter mounting location. This might include panel removal tools, wire loom, or even a heat gun for shaping certain materials. Make sure you have enough wiring to reach the amplifier or head unit from the tweeter location. Having all the necessary materials readily available will significantly reduce the installation time and ensure a smooth, efficient process. A well-organized workspace will also make the job easier and less stressful.
Preparing the Tweeter Mounting Area
Once you’ve chosen the installation location, prepare the area for mounting the tweeters. This may involve removing parts of the car’s interior trim, such as door panels or sections of the dashboard. Use appropriate trim removal tools to avoid damaging the plastic panels. After removing the panels, carefully clean the mounting area to remove any dust or debris that could interfere with the installation. This ensures a clean and secure mount.
Subsequently, if necessary, create the mounting holes for the tweeter brackets using the drill and appropriate drill bits. Be precise when drilling to avoid damaging surrounding components. If you’re using sound-deadening material, apply it to the mounting area to reduce vibrations and improve sound quality. This step is particularly important if you’re mounting the tweeters in a location prone to vibrations, such as a door panel. A well-prepared mounting area ensures a secure and stable installation.
Installing the Tweeter Mounting Brackets
With the mounting area prepared, you can now install the tweeter mounting brackets. These brackets provide a secure and stable base for the tweeters. Carefully align the brackets with the mounting holes and secure them using the appropriate screws. Ensure the brackets are firmly attached to prevent vibrations and ensure the tweeters are securely mounted. Take your time and double-check the alignment before tightening the screws.
In addition, some brackets may require minor adjustments to ensure a perfect fit. Use a level to ensure the tweeters are mounted straight. This will not only improve the aesthetic appearance but also ensure optimal sound projection. If you encounter any difficulties during this step, consult the tweeter’s installation instructions or seek professional assistance. Proper bracket installation is fundamental to a successful and long-lasting tweeter setup.
Connecting the Tweeters to the Amplifier
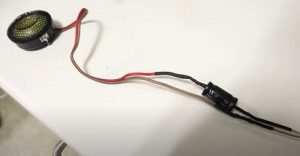
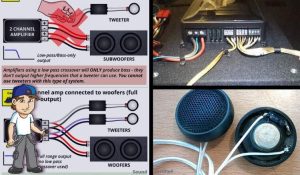
Connecting the tweeters to the amplifier is a crucial step that requires careful attention to detail. First, identify the amplifier’s output channels designated for the tweeters. Consult your amplifier’s manual for guidance. Using the wire stripper/cutter, strip the ends of the tweeter wires and the amplifier output wires. Ensure that the wires are properly stripped to prevent poor connections. Then, securely connect the positive and negative wires from the tweeters to the corresponding positive and negative output channels on the amplifier.
Moreover, you can solder the connections for a more secure and reliable connection, or use crimp connectors if soldering isn’t an option. Always double-check the polarity (positive to positive, negative to negative) to prevent damage to the tweeters and amplifier. After making the connections, secure the wires using electrical tape or wire loom to prevent shorts and maintain a neat installation. Accurate wiring is essential for optimal sound quality and the longevity of your components.
Running Wiring and Making Connections
Running the wiring from the tweeters to the amplifier requires careful planning and execution. Route the wires neatly and securely, avoiding sharp edges and moving parts. Use wire loom or zip ties to bundle and secure the wires, keeping them organized and out of the way. You may need to run the wires through existing channels or create new pathways using appropriate tools. Always ensure that the wires are protected from potential damage.
Furthermore, consider using high-quality speaker wire for optimal signal transmission. Avoid running the wires near power cables or other electrical components to prevent interference. If you’re working in a confined space, patience is key. Take your time and carefully route the wires to ensure a clean and professional installation. Proper wiring is essential for optimal sound quality and system longevity.
Testing Tweeter Sound and Adjustments
Once the tweeters are connected, it’s time to test the sound. Turn on the head unit or amplifier and play some music with a wide range of frequencies. Listen carefully for any distortion, buzzing, or other unusual sounds. If you hear any problems, double-check all connections and wiring. Ensure the polarity is correct and that all connections are secure. If the sound is too loud or too quiet, adjust the gain settings on the amplifier.
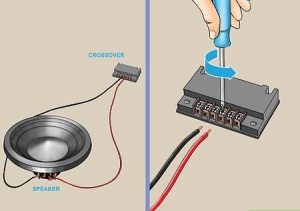
Additionally, you may need to adjust the crossover settings to fine-tune the frequency response of the tweeters. This involves adjusting the frequency at which the tweeters begin to play. Experiment with different settings to find the optimal balance between the tweeters and the other speakers in your system. This process may require some trial and error to achieve the desired sound. Remember, patience and careful listening are crucial for achieving optimal sound quality.
Finalizing the Installation and Clean-up
After testing and making any necessary adjustments, reassemble the car’s interior trim panels. Ensure all panels are securely fastened and that there are no loose wires or components. Inspect the installation to make sure everything is neat and tidy. Take pride in your work; a clean and professional installation enhances the overall experience.
Finally, clean up any debris or leftover materials. Dispose of them responsibly. Admire your handiwork! You’ve successfully installed tweeters in your car, significantly