The 2010 Camaro SS roars with muscle car power, but its factory audio system often leaves enthusiasts wanting more. Upgrading the speakers transforms your driving experience, delivering crisp highs, rich mids, and deep bass that match the car’s bold personality. This guide walks you through everything you need to know to upgrade your Camaro SS speakers, from choosing the right components to installing them like a pro. Whether you’re a car audio newbie or a seasoned gearhead, you’ll find practical tips, step-by-step instructions, and expert advice to make your sound system sing.
Contents
- Why Upgrade Your Camaro SS Speakers?
- Understanding the 2010 Camaro SS Audio System
- Choosing the Best Speakers for Your Camaro SS
- Tools and Materials You’ll Need
- Step-by-Step Speaker Installation Guide
- Should You Add an Amplifier?
- Adding a Subwoofer for Extra Bass
- Common Mistakes to Avoid
- Maintenance Tips for Your New Audio System
- Cost Breakdown
- Frequently Asked Questions
- Conclusion
Why Upgrade Your Camaro SS Speakers?
The stock audio system in the 2010 Camaro SS, even with the optional Boston Acoustics setup, struggles to deliver the clarity and depth modern drivers crave. Factory speakers use low-quality materials that distort at high volumes, muddying your music. Upgrading to aftermarket speakers improves sound quality, enhances bass response, and ensures your tunes stand out, even with the engine roaring or windows down.
A speaker upgrade also boosts your car’s resale value. Audio enthusiasts appreciate a well-installed, high-quality sound system, making your Camaro more appealing on the market. Plus, the process is straightforward, requiring minimal tools and basic DIY skills. Ready to dive in? Let’s explore the essentials.
Understanding the 2010 Camaro SS Audio System
Before you start, familiarize yourself with the Camaro’s audio setup. The 2010 SS typically comes with a 6-speaker system (base model) or a 9-speaker Boston Acoustics system (premium option). Here’s the breakdown:
- Front Doors: 6.5-inch speakers (component or coaxial, depending on trim).
- Rear Deck: 6×9-inch speakers.
- Center Dash: 3.5-inch speaker (premium system only).
- Rear Pillars: 3.5-inch speakers (premium system only).
The factory head unit powers these speakers, but its limited output (around 20-30 watts RMS per channel) restricts performance. Aftermarket speakers with higher sensitivity ratings (measured in dB) maximize the headLand unit’s power, delivering louder, clearer sound without needing an external amplifier. However, adding an amp unlocks even more potential, especially for bass-heavy setups.
Choosing the Best Speakers for Your Camaro SS
Selecting the right speakers ensures your upgrade meets your audio goals. Consider these factors when shopping:
1. Speaker Type
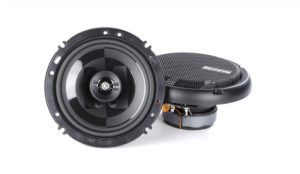
- Coaxial Speakers: These all-in-one units combine a woofer and tweeter, making them easy to install. They’re ideal for beginners or budget-conscious upgrades. Brands like Pioneer, Kenwood, and JBL offer excellent coaxial options for the Camaro.
- Component Speakers: These separate woofers, tweeters, and crossovers deliver superior sound quality but require more installation effort. Focal, JL Audio, and Hertz make top-tier component systems for audiophiles.
2. Size and Fit
Match the speaker size to your Camaro’s factory locations:
- 6.5-inch speakers for front doors.
- 6×9-inch speakers for the rear deck.
- 3.5-inch speakers for the dash and pillars (if upgrading the premium system).
Check the mounting depth to avoid clearance issues, especially in the doors. Most aftermarket speakers include adapter plates or spacers for a snug fit.
3. Power Handling
Look for speakers with an RMS power rating that matches or exceeds the factory head unit’s output (20-30 watts). If you plan to add an amplifier, choose speakers with higher RMS ratings (50-100 watts) to handle the extra power.
4. Sensitivity
Speakers with a sensitivity of 90 dB or higher produce louder sound with less power, making them perfect for the stock head unit. High-sensitivity speakers from Alpine or Rockford Fosgate shine in this setup.
5. Sound Preferences
Do you crave booming bass for hip-hop or crystal-clear vocals for rock? Read reviews and listen to speakers in person if possible. Brands like Kicker emphasize bass, while Infinity prioritizes clarity.
Top Speaker Recommendations
- Budget-Friendly: Pioneer TS-A1676R (6.5-inch coaxial, $80/pair).
- Mid-Range: JBL Stage 9603 (6×9-inch coaxial, $120/pair).
- Premium: Focal Performance PS 165F (6.5-inch component, $400/pair).
- Best for Bass: Kicker 43DSC69304 (6×9-inch coaxial, $150/pair).
Tools and Materials You’ll Need
Gather these items before starting your upgrade:
- Screwdrivers (Phillips and flathead).
- Panel removal tools (plastic pry tools to avoid scratching trim).
- Wire cutters and crimpers.
- Speaker wire (16-gauge for short runs, 14-gauge for amplified setups).
- Quick-disconnect terminals or soldering kit.
- Foam gaskets or Dynamat for sound deadening.
- Speaker adapters (if required for fitment).
- Zip ties for cable management.
Pro tip: Invest in sound-deadening mats like Dynamat or Noico to reduce road noise and enhance bass response. Applying these to door panels and the rear deck makes a noticeable difference.
Step-by-Step Speaker Installation Guide
Follow these steps to upgrade your Camaro SS speakers. This guide focuses on the front door and rear deck speakers, as they deliver the most significant audio improvement.
Step 1: Prepare Your Workspace
Park your Camaro in a shaded, well-lit area. Disconnect the negative battery terminal to prevent electrical shorts. Lay out your tools and speakers for easy access.
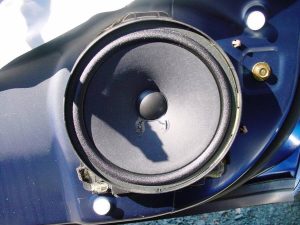
Step 2: Remove the Door Panels
- Pry off the sail panel: Use a plastic pry tool to pop off the triangular panel near the side mirror.
- Remove screws: Locate and unscrew the bolts behind the door handle, armrest, and along the panel’s edge (typically 7-10 screws).
- Lift the panel: Gently pull the panel upward to release the clips, then disconnect the wiring harnesses for the power windows and locks.
- Set aside safely: Place the panel in a clean area to avoid scratches.
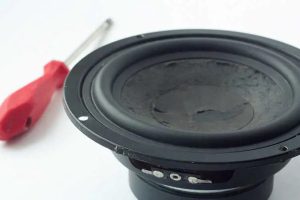
Step 3: Replace the Door Speakers
- Remove the factory speaker: Unscrew or unclip the stock 6.5-inch speaker from the door. Disconnect the wiring harness.
- Install sound deadening (optional): Apply Dynamat or similar material to the door’s inner panel to reduce vibrations.
- Connect the new speaker: Attach the aftermarket speaker’s wiring adapter to the factory harness. Use quick-disconnect terminals or solder for a secure connection.
- Mount the speaker: Secure the new speaker using the factory screws or provided adapters. Ensure it sits flush and doesn’t rattle.
- Test the sound: Reconnect the battery temporarily and play music to confirm the speaker works.
Step 4: Reassemble the Door
- Reattach wiring harnesses: Plug in the power window and lock connectors.
- Snap the panel back: Align the door panel’s clips and press firmly to secure. Replace all screws and the sail panel.
- Repeat for the other door.
Step 5: Upgrade the Rear Deck Speakers
- Access the rear deck: Fold down the rear seats and remove the rear deck cover (usually held by clips or screws).
- Remove factory speakers: Unscrew the 6×9-inch speakers and disconnect their wiring.
- Install new speakers: Connect the new 6×9 speakers to the factory harness, then secure them in place. Use adapters if needed.
- Add sound deadening: Apply Dynamat to the rear deck for tighter bass.
- Test and reassemble: Play music to verify sound quality, then replace the rear deck cover.
Step 6: Final Testing
Reconnect the battery fully. Play music at various volumes to check for distortion or rattles. Adjust the head unit’s equalizer settings (bass, treble, balance) to optimize the sound. If you hear buzzing, double-check the speaker mounts and tighten any loose screws.
Should You Add an Amplifier?
While aftermarket speakers improve sound on their own, an amplifier takes your audio to the next level. An amp delivers cleaner power, allowing your speakers to perform at their best. For the Camaro SS, a 4-channel amp with 50-75 watts RMS per channel pairs well with most aftermarket speakers.
Benefits of an Amplifier
- Louder, distortion-free sound.
- Enhanced bass and dynamic range.
- Better performance at high volumes.
Installation Tips
- Mount the amp under a seat or in the trunk to save space.
- Use a wiring kit with a proper fuse to protect your electrical system.
- Consider a professional installer if you’re new to amp setups.
Popular amps for the Camaro include the Alpine BBX-T600 (budget), Rockford Fosgate R600X5 (mid-range), and JL Audio XD400/4v2 (premium).
Adding a Subwoofer for Extra Bass
Craving earth-shaking bass? A subwoofer complements your speaker upgrade. The Camaro’s trunk offers ample space for a 10- or 12-inch sub in a sealed or ported enclosure. Pair it with a mono amp (500-1000 watts RMS) for optimal performance.
Top Subwoofer Picks
- Budget: Kicker 44CWCS104 (10-inch, $150).
- Mid-Range: JL Audio 10W3v3-4 (10-inch, $300).
- Premium: Alpine R-W12D4 (12-inch, $450).
Installation Notes
- Secure the sub enclosure to prevent movement while driving.
- Run power and RCA cables neatly to avoid interference.
- Tune the amp’s low-pass filter to blend the sub with your speakers.
Common Mistakes to Avoid
- Skipping sound deadening: Without it, road noise and vibrations degrade sound quality.
- Mismatched power ratings: Pairing low-power speakers with a high-output amp risks damage.
- Poor wiring connections: Loose or cheap connectors cause signal loss or shorts.
- Ignoring polarity: Reversing positive and negative wires reduces bass and muddies sound.
Maintenance Tips for Your New Audio System
- Clean speakers with a soft, dry cloth to remove dust.
- Check wiring connections annually to ensure they’re secure.
- Avoid maxing out the volume for extended periods to prevent speaker damage.
- Update your head unit’s firmware if it supports Bluetooth or USB for better compatibility.
Cost Breakdown
- Speakers: $80-$400 per pair.
- Sound Deadening: $50-$150.
- Amplifier (optional): $100-$500.
- Subwoofer (optional): $150-$450.
- Tools and Wiring: $20-$100.
Total for a basic speaker upgrade: $200-$600. Adding an amp and sub pushes costs to $500-$1500, depending on components.
Frequently Asked Questions
Can I keep the factory head unit?
Yes, high-sensitivity aftermarket speakers work well with the stock head unit. For the best results, add an amplifier.
Do I need a professional installer?
DIY installation is manageable with basic tools and patience. If you’re adding an amp or sub, a pro ensures proper wiring and tuning.
How long does the upgrade take?
Replacing door and rear deck speakers takes 3-5 hours for beginners. Sound deadening and amp installation add 2-4 hours.
Conclusion
Upgrading the speakers in your 2010 Camaro SS transforms your driving experience, delivering the powerful, clear audio you deserve. By choosing the right speakers, following a careful installation process, and considering extras like an amp or subwoofer, you’ll create a sound system that rivals the car’s performance. Take your time, double-check connections, and enjoy the thrill of music that matches the Camaro’s roar. Ready to get started? Grab your tools, pick your speakers, and crank up the volume!