Upgrading the car stereo in your 2003 GMC Sierra breathes new life into your driving experience. Crisp audio, booming bass, and clear vocals transform mundane commutes into immersive journeys. But before you dive into the world of aftermarket speakers, you need to know the correct speaker sizes for your Sierra. This guide simplifies the process, offering detailed insights into speaker sizes, installation tips, and upgrade recommendations for your 2003 GMC Sierra. Whether you’re a seasoned audiophile or a first-time installer, this article equips you with everything you need to enhance your truck’s sound system.
Contents
- Why Upgrade Your 2003 GMC Sierra’s Stereo System?
- Speaker Sizes for the 2003 GMC Sierra
- Tools and Materials Needed for Installation
- Step-by-Step Guide to Installing New Speakers
- Choosing the Best Speakers for Your 2003 GMC Sierra
- Adding an Amplifier for Better Sound
- Common Mistakes to Avoid
- Maintaining Your New Stereo System
- FAQs About 2003 GMC Sierra Speaker Upgrades
- Conclusion
Why Upgrade Your 2003 GMC Sierra’s Stereo System?
The factory-installed speakers in the 2003 GMC Sierra deliver decent sound for casual listening. However, they often lack the depth, clarity, and power that modern aftermarket speakers provide. Upgrading your speakers improves audio quality, enhances bass response, and allows you to enjoy music the way it was meant to be heard. A high-quality stereo system also increases your vehicle’s resale value and makes long drives more enjoyable.
When planning your upgrade, consider the speaker sizes, compatibility with your Sierra’s trim, and the type of audio experience you want. Do you crave heart-pounding bass? Or do you prefer crystal-clear vocals for podcasts and audiobooks? Knowing your goals helps you choose the right speakers and avoid costly mistakes.
Speaker Sizes for the 2003 GMC Sierra
The 2003 GMC Sierra comes in various trims, including the Regular Cab, Extended Cab, and Crew Cab. Speaker sizes and configurations vary slightly depending on the cab type and whether your truck has a premium audio system, like the Bose setup. Below, we break down the speaker sizes for each location in the 2003 GMC Sierra to ensure a seamless upgrade.
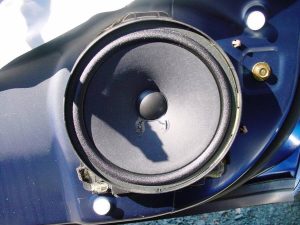
Front Door Speakers
The front doors of the 2003 GMC Sierra house 6.5-inch speakers in most models. These speakers handle mid-range frequencies and vocals, making them critical for a balanced soundstage. Some trims with premium audio systems may use a component speaker setup, which includes a separate 6.5-inch woofer and a tweeter for high frequencies.
When replacing front door speakers, ensure the aftermarket speakers match the 6.5-inch diameter. Check the mounting depth, as some speakers require more space than the factory units. A depth of around 2.5 to 3 inches typically fits well. If your Sierra has a component system, you may need to install tweeters separately, often in the A-pillar or dashboard.
Rear Door Speakers
For Extended Cab and Crew Cab models, the rear doors also feature 6.5-inch speakers. These speakers contribute to the overall soundstage, providing a surround-like experience for rear passengers. Regular Cab models do not have rear doors, so they lack rear door speakers.
When upgrading rear door speakers, stick with 6.5-inch models to avoid modifications. Pay attention to the power handling and sensitivity ratings to ensure compatibility with your head unit or amplifier. A sensitivity rating of 88 dB or higher works well for most setups.
Rear Pillar Speakers (Extended Cab)
In Extended Cab models, you’ll find 4×6-inch speakers in the rear pillars. These smaller speakers focus on high frequencies and fill the cabin with sound. They’re less critical for bass but play a role in creating an immersive audio environment.
Replacing 4×6-inch speakers is straightforward, but options are limited compared to 6.5-inch models. Some owners upgrade to 5×7-inch speakers with adapters for improved sound quality, though this requires minor modifications.
Dashboard Tweeters
Some 2003 GMC Sierra trims, particularly those with the Bose system, include tweeters in the dashboard. These are typically 1-inch or 2-inch tweeters designed to handle high frequencies, such as cymbals and vocals. If your truck has a base audio system, it may not include tweeters.
When upgrading, you can add aftermarket tweeters to improve clarity. Ensure proper wiring and consider a crossover to direct high frequencies to the tweeters and mids to the door speakers.
Subwoofer (Optional)
The 2003 GMC Sierra does not come with a factory-installed subwoofer in most trims. However, adding an aftermarket subwoofer dramatically enhances bass output. A 10-inch or 12-inch subwoofer in a custom enclosure fits well under the rear seat of Extended Cab or Crew Cab models. For Regular Cab models, consider a compact powered subwoofer to save space.
When choosing a subwoofer, match it to your amplifier’s power output. A subwoofer with a power handling of 200-500 watts RMS pairs well with most aftermarket amps.
Tools and Materials Needed for Installation
Installing new speakers in your 2003 GMC Sierra requires a few basic tools and materials. Having everything on hand streamlines the process and prevents delays. Here’s what you’ll need:
- Screwdrivers: Phillips and flathead for removing door panels and screws.
- Panel Removal Tool: Prevents damage to door panels during removal.
- Wire Cutters/Strippers: For trimming and preparing speaker wires.
- Crimp Connectors: For secure wire connections.
- Speaker Adapters: To fit aftermarket speakers into factory mounts.
- Sound Deadening Material: Reduces vibrations and improves sound quality.
- Electrical Tape: Secures wiring and prevents shorts.
- Socket Wrench Set: For removing bolts in tight spaces.
Before starting, disconnect the negative battery terminal to avoid electrical issues. Double-check that your new speakers come with wiring harnesses or adapters for a plug-and-play installation.
Step-by-Step Guide to Installing New Speakers
Follow these steps to install new speakers in your 2003 GMC Sierra. This guide focuses on front door speakers but applies to rear doors and pillar speakers with minor adjustments.
Step 1: Remove the Door Panel
Use a panel removal tool to pry off the door panel. Start at the bottom and work your way around, releasing the clips. Remove any screws near the armrest or door handle. Disconnect the window and lock wiring harnesses, then lift the panel off.
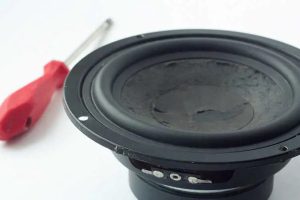
Step 2: Remove the Factory Speaker
Locate the factory speaker, typically held in place by screws or rivets. Remove the screws or drill out the rivets. Disconnect the speaker’s wiring harness and remove the speaker.
Step 3: Install the New Speaker
Connect the new speaker to the wiring harness using an adapter if needed. Secure the speaker to the mounting bracket with screws. If the speaker doesn’t fit perfectly, use a speaker adapter ring. Test the connection before reassembling.
Step 4: Add Sound Deadening Material
Apply sound deadening material to the door’s interior to reduce vibrations and enhance sound quality. Focus on areas near the speaker and the door’s outer skin.
Step 5: Reassemble the Door Panel
Reconnect the window and lock harnesses, then snap the door panel back into place. Secure any screws and test the speaker to ensure it works properly.
Step 6: Repeat for Other Speakers
Repeat the process for rear door speakers, pillar speakers, or tweeters as needed. For subwoofers, follow the manufacturer’s instructions for wiring and enclosure placement.
Choosing the Best Speakers for Your 2003 GMC Sierra
Selecting the right speakers depends on your budget, audio preferences, and whether you’re adding an amplifier. Here are some top recommendations for 6.5-inch and 4×6-inch speakers, along with key features to consider.
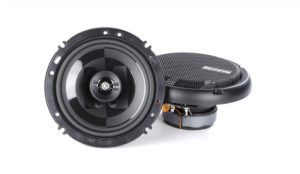
Top 6.5-Inch Speakers
- Kicker DS Series 6.5” Coaxial Speakers: Deliver punchy bass and clear mids. Rated at 60 watts RMS with 90 dB sensitivity. Ideal for factory head units.
- JL Audio C2-650X: Offer crisp highs and tight bass. Handle 60 watts RMS and work well with or without an amp.
- Pioneer TS-A1680F: Budget-friendly with strong mid-bass. Rated at 80 watts RMS and 88 dB sensitivity.
Top 4×6-Inch Speakers
- Kenwood KFC-4667S: Provide balanced sound for rear pillars. Handle 30 watts RMS with 88 dB sensitivity.
- Rockford Fosgate R14X2: Deliver clear highs and decent mids. Rated at 30 watts RMS, perfect for stock systems.
Key Features to Look For
- Power Handling: Match the speaker’s RMS rating to your head unit or amp’s output.
- Sensitivity: Higher sensitivity (88 dB or more) ensures better performance with low power.
- Materials: Look for polypropylene cones and silk dome tweeters for durability and sound quality.
- Frequency Range: A wide range (e.g., 40 Hz to 20 kHz) ensures full-spectrum audio.
Adding an Amplifier for Better Sound
For maximum performance, pair your new speakers with an amplifier. An amp boosts power, improves clarity, and drives larger speakers or subwoofers. A 4-channel amp works well for powering front and rear speakers, while a mono amp is ideal for a subwoofer.
When choosing an amp, ensure it matches your speakers’ power handling. For example, a 50-watt RMS per channel amp pairs well with 6.5-inch speakers rated at 50-60 watts RMS. Professional installation is recommended for complex setups to avoid wiring issues.
Common Mistakes to Avoid
Upgrading your Sierra’s stereo is straightforward, but mistakes can derail your project. Avoid these pitfalls:
- Buying Incorrect Speaker Sizes: Always verify sizes (6.5-inch or 4×6-inch) before purchasing.
- Ignoring Mounting Depth: Deep speakers may not fit without spacers or modifications.
- Skipping Sound Deadening: Without it, vibrations can distort sound.
- Overpowering Speakers: Mismatched amps can damage speakers. Check RMS ratings.
- Poor Wiring: Loose connections cause static or failure. Use crimp connectors and tape.
Maintaining Your New Stereo System
To keep your new speakers performing at their best, follow these maintenance tips:
- Clean Regularly: Dust speakers with a soft cloth to prevent buildup.
- Check Connections: Inspect wiring annually for wear or corrosion.
- Avoid Overloading: Don’t crank the volume beyond the speakers’ limits to prevent distortion.
- Protect from Moisture: Ensure door seals are intact to avoid water damage.
FAQs About 2003 GMC Sierra Speaker Upgrades
Q: Can I use 5×7-inch speakers in my Sierra?
A: Yes, but you’ll need adapters for the 6.5-inch mounts. Check mounting depth to ensure a proper fit.
Q: Do I need an amplifier for new speakers?
A: Not always. High-sensitivity speakers work well with factory head units, but an amp enhances performance.
Q: How long does installation take?
A: Plan for 1-2 hours per door for beginners. Experienced installers may finish faster.
Q: Will new speakers fit my Bose system?
A: Bose systems use specific wiring and amps. You may need adapters or a new amp for aftermarket speakers.
Conclusion
Upgrading the speakers in your 2003 GMC Sierra transforms your driving experience with richer, clearer sound. By choosing the right 6.5-inch front and rear door speakers, 4×6-inch pillar speakers, and optional subwoofer, you create a custom audio setup tailored to your preferences. Use this guide to select compatible speakers, follow proper installation steps, and avoid common mistakes. With the right tools and a little patience, you’ll enjoy a premium stereo system that makes every drive a pleasure.
Ready to start your upgrade? Check your Sierra’s trim, grab your tools, and dive into the world of car audio. Your ears will thank you.